A high-quality certificate of participation template is so much more than a piece of paper. It’s a powerful tool for your brand, a smart marketing move, and a way to create a memorable experience for every participant. This simple act of recognition can seriously boost brand recall and get people sharing on social media long after your event wraps up.
Why a Great Certificate Template Matters More Than You Think
Let’s stop thinking of a certificate as just a formality. A well-crafted certificate of participation is a tangible reminder of the value you provide and your commitment to your community. It becomes a lasting artifact from a workshop, webinar, or training course.
Think about the difference it makes. A generic, slapped-together certificate feels like an afterthought. It’ll probably get tucked away in a drawer and forgotten. But a professional, personalized certificate? That becomes a point of pride.

Driving Engagement and Brand Loyalty
A thoughtfully designed certificate practically begs to be shared online. When a participant posts their certificate on LinkedIn or Instagram, they aren't just celebrating their own achievement—they're giving your organization fantastic, organic marketing. This kind of social proof introduces your brand to whole new audiences, completely free of charge.
This small gesture has a huge impact on the participant experience by:
- Validating Their Effort: It’s a formal acknowledgment of the time and energy someone put into your event or course.
- Building a Connection: A personalized touch makes people feel seen and valued, which strengthens their bond with your brand.
- Encouraging Repeat Business: Positive experiences create loyal customers who are far more likely to sign up for whatever you offer next.
A certificate is often the very last touchpoint a participant has with your brand after an event. If you make it a memorable and professional one, their lasting impression will be a positive one, directly influencing their decision to come back.
This isn't just a hunch; the growing emphasis on validated credentials backs it up. The global certificate authority market is projected to hit $485.13 million by 2032, growing at a compound annual rate of 11.32%. This trend highlights just how important both digital and physical certificates have become in professional settings. You can discover more insights about the certificate authority market growth to see where things are headed.
The Power of Professionalism
Ultimately, the quality of your certificate reflects the quality of your entire organization. A polished, professional design communicates credibility and a real attention to detail. It sends the message that the program or event itself was valuable and well-organized.
This perception is critical for building trust, whether you're a coach, an event organizer, or a corporate trainer. Investing in a great certificate of participation template isn't just a nice extra—it's a direct investment in your brand's reputation.
Thinking through the concrete benefits can really highlight the value. Here’s a quick breakdown of why a professional template is a smart move.
Key Benefits of Using a Professional Certificate Template
| Benefit | Impact on Your Organization | Real-World Scenario |
|---|---|---|
| Enhanced Brand Image | Reinforces professionalism and credibility. | A corporate training company uses sleek, branded certificates, making their courses seem more valuable and legitimate to participants and their employers. |
| Increased Social Sharing | Generates organic marketing and expands your reach. | An online course creator designs an eye-catching certificate. Graduates proudly post it on LinkedIn, driving new traffic to the course landing page. |
| Improved Participant Loyalty | Makes attendees feel valued, encouraging repeat business. | A webinar host sends personalized certificates after each session. Attendees feel appreciated and are more likely to register for future webinars. |
| Time and Cost Efficiency | Saves hours of design work while ensuring a high-quality result. | A small business owner uses a pre-designed template, allowing them to issue certificates instantly without hiring a graphic designer. |
As you can see, the ripple effects of a well-designed certificate extend far beyond the document itself, influencing perception, marketing, and loyalty.
Deconstructing an Unforgettable Certificate
Before you jump into a design tool, let's break down the anatomy of a certificate that actually leaves a lasting impression. Sure, every certificate of participation template covers the basics, but it's the subtle details that separate a generic document from a memorable token of achievement. Think of it as the difference between a form letter and a personal note—both get the point across, but only one creates a real connection.
First things first, you have to get the non-negotiables right. These are the functional parts that give the certificate its credibility and make sure it serves its main purpose: validation.
Here’s your essential checklist:
- A Clear Title: "Certificate of Participation" or "Certificate of Attendance" needs to be front and center.
- Recipient's Full Name: This is the most critical piece of personalization. Get it right.
- Issuing Organization's Name and Logo: Your branding has to be clear and look professional.
- Event or Course Title: Be specific. "Annual Leadership Summit 2024" is much better than just "Leadership Summit."
- Date of Issuance: This provides context and confirms when the event happened.
- Authorized Signature: A digital or scanned signature adds that final layer of authenticity.
But just listing these things isn't enough. The real magic happens in how you present them and what else you add to the mix.
Moving Beyond the Basics
To create a certificate that feels genuinely special, you need to think about the language and the overall presentation. The words you choose can dramatically shift how valuable the recognition feels.
For instance, instead of a bland "for participating in," try something with more impact, like "In Recognition of Active Participation and Contribution to" or "Awarded for the Successful Completion of." That small tweak in phrasing frames the achievement as something far more significant.
The goal is to make the recipient feel proud. Your certificate should be more than proof of attendance; it should be a trophy they’re excited to display and share online.
Branding consistency is also a huge deal. The fonts, colors, and logo on your certificate should perfectly match your organization's visual identity. This reinforces your brand and builds a sense of professionalism. A disjointed, off-brand design can cheapen the whole experience.
The Finishing Touches That Matter
The finer points of design can make or break your certificate. Good typography, for example, is essential. Using a classic serif font for the recipient's name can add a touch of prestige, while a clean sans-serif font for the descriptive text keeps it readable.
Consider adding a few other elements to boost the certificate's perceived value:
- A Unique Certificate ID: Adding a serial number or unique ID makes each certificate feel official and verifiable.
- A Brief Description: A short sentence describing the event or a key takeaway adds valuable context.
- A Digital Seal or Emblem: A custom seal adds a touch of formality, much like a traditional embossed one.
Finally, think about what happens after you hit "send." Many people will want to print and display their accomplishment. To make your certificate a truly cherished memento, you have to consider how it looks in the real world. Pairing it with high-quality certificate frames, for example, can elevate its perceived value instantly. When you nail these details, you turn a simple document into a powerful branding tool that people will value for years.
Designing a Certificate Template Without Being a Designer
You don't need a formal design background to create a genuinely impressive certificate of participation. Forget complex software or needing an art degree—good design is really about clear communication and making thoughtful choices. If you focus on a few core principles, you can absolutely produce a certificate that looks polished, professional, and valuable.
The first step is to think about the feeling you want to convey. Is this for a formal corporate summit or a creative, hands-on workshop? Your answer will guide every decision you make, from the colors you choose to the fonts you use.

This idea of thoughtful design isn't unique to certificates. The same principles that make a document like a golf scorecard clear and easy to use apply here. The visual appeal and layout are crucial for how the certificate is perceived. You can even see how these concepts translate across different formats by checking out these design tips for your tournament scorecard.
Harnessing Color and Typography
Color is a powerful tool for setting the tone. It’s one of the first things people notice, and it can instantly communicate your brand's personality and the event's vibe.
For a corporate or academic event, a palette of deep blues, grays, or burgundy tones conveys authority and tradition. On the other hand, for something like a wellness retreat or an arts workshop, brighter and more vibrant colors like teal, coral, or gold can create a feeling of energy and creativity.
The trick is to keep it simple. Sticking to a limited palette of two or three complementary colors will always look more sophisticated than a chaotic mix.
Typography is the voice of your document. The right font pairing can make your certificate look credible and refined, while the wrong choice can make it feel amateurish.
A great rule of thumb is to pair a serif font (like Cormorant or Marcellus) for headings or the recipient's name with a clean sans-serif font (like Open Sans or Poppins) for the body text. This contrast creates an obvious visual hierarchy and makes everything easier to read.
Mastering Layout and Spacing
Whitespace—the empty space around your text and design elements—is your best friend. A cluttered certificate looks busy and immediately cheapens the impression it makes. Generous margins and ample spacing between lines of text create a clean, elegant layout that’s a pleasure to look at.
Try to organize your information into a logical grid. It doesn't have to be rigid, but aligning key elements helps guide the viewer's eye through the document smoothly and professionally.
Here are a few layout tips that make a big difference:
- Center the Main Title: "Certificate of Participation" should be front and center at the top.
- Emphasize the Recipient's Name: Use a larger font or a more decorative script for the name to make it the star of the show.
- Group Related Information: Keep the event details, date, and location together. This creates a cohesive block of text that’s easy to scan.
- Balance Your Logo and Signatures: Position your organization's logo in one corner (like the top left) and the signature lines at the bottom. This creates a nice visual balance.
A well-balanced design just feels intentional and professional. If you want to dive deeper into creating effective credentials, you can check out our guide on how to create a professional training certificate template.
Adding Simple but Impactful Elements
Small details can elevate your design in a big way. You don't need intricate illustrations to make your certificate stand out. Simple, well-executed elements can add that extra touch of formality and prestige.
Consider incorporating one of these features:
- A Simple Border: A classic double-line or dotted border frames the content beautifully and gives the certificate a finished look.
- A Digital Seal or Emblem: You can create a simple digital seal with your organization's initials or logo. Placing it near the signature line adds a layer of authenticity.
- Subtle Background Textures: A very light, subtle pattern or texture in the background can add depth without being distracting.
These small additions contribute to the certificate’s perceived value. And that’s incredibly important, especially now that professional certifications and industry micro-credentials are key differentiators in the job market. Among students and recent graduates, a staggering 86% agree that earning an industry micro-credential would help them stand out to employers. By making your certificate look official, you're giving participants a tool they can be proud to use for their own career advancement.
How to Automate Certificate Delivery with OKZest
Let's be honest: manually creating certificates is a total grind. It seems easy enough at first, but it quickly snowballs into a massive administrative headache. For every single workshop, webinar, or training course, you're stuck in a loop of editing names, dates, and course titles, one by one. Not only is it painfully slow, but it's practically an invitation for human error and a huge drain on your time.
Picture this: you've just finished a fantastic webinar with 500 attendees. The follow-up is where you cement the value you provided. You want to send a sharp, personalized thank-you email with a professional certificate of participation. Doing that by hand would take hours, maybe even days, of mind-numbing work. This is exactly where automation completely changes the game.
When you connect a certificate of participation template to a tool like OKZest, you can set the entire process to run on its own. This shift lets you get back to what you're best at—creating great content and engaging with your audience—instead of getting bogged down in repetitive tasks.
Setting Up Your Template in OKZest
First things first, you'll need to get your base certificate design into OKZest. This is just your static background image—the design you've already created with your branding, borders, and logo. OKZest plays nicely with standard image files like PNG or JPG, so you can just upload the design you've already perfected.
Once your template is uploaded, the fun part begins. You’ll start defining dynamic fields, which are essentially smart placeholders for the information that changes for each person. Think of them as designated blank spots on your certificate that OKZest will fill in automatically.
You’ll probably want to add fields for things like:
- Recipient’s Full Name: The most important bit of personalization, of course.
- Course or Event Title: To specify what the certificate is for.
- Completion Date: The date the event happened or the course was finished.
- A Unique Certificate ID: A great touch for adding a layer of authenticity.
Each of these fields becomes a layer that sits on top of your background image. Inside the OKZest editor, you can drag and drop them exactly where you want them, pick your fonts, tweak the sizes, and set the colors. It gives you total control over the look and feel of the final, personalized certificate.
Using Merge Tags to Personalize at Scale
With your dynamic fields positioned on the template, you’re ready to connect your data source. This is usually just a simple spreadsheet (a CSV file works great) or a contact list from your email marketing platform. This file holds all the information OKZest needs to populate the certificates, like the names and email addresses of your attendees.
OKZest uses merge tags (you might also know them as personalization tags) to pull that data into your certificate template. A merge tag is just a small snippet of code, like {{first_name}} or {{course_title}}, that matches up with a column in your data source.
When the automation kicks off, OKZest reads the merge tag on your certificate, finds the matching column in your spreadsheet, and plugs in the right information for each person on your list. The outcome? Hundreds or thousands of unique, personalized certificates are generated almost instantly.
Here’s a peek at what the OKZest interface looks like as you set up these dynamic elements.
As you can see, the platform lets you layer text and dynamic fields right onto your uploaded template, giving you a live preview of how it will all come together.
The Importance of Fallback Values
But what happens when your data isn't perfect? It's a super common problem. Maybe an attendee signed up without their full name, or a cell in your spreadsheet is just empty. Without a plan B, your automated certificate could go out with an awkward blank space, which doesn't look very professional.
This is why fallback values are so important. A fallback is simply a default piece of text that OKZest will use if the data for a specific field is missing.
Think of a fallback value as your safety net. It ensures that no matter how messy your data is, every single certificate you send out looks complete and professional.
For example, you could set the fallback for the {{first_name}} field to something friendly but generic, like "Valued Attendee" or "Our Guest." That way, if a name is missing, the certificate won’t have a glaring empty spot. It will display your fallback text instead, maintaining a polished look. It's a small detail that makes a big difference in protecting your brand's reputation.
Integrating with Your Email Platform
Okay, your certificates are designed and ready to be generated. The final step is getting them to your audience. OKZest integrates smoothly with pretty much any email service provider, from popular platforms like Mailchimp and Klaviyo to Instantly. This lets you embed the personalized certificates right into your follow-up email campaigns.
The process is incredibly straightforward:
- Generate a URL: For each certificate, OKZest creates a unique image URL.
- Use Merge Tags in Your Email: You'll pop this dynamic URL into your email template using the same merge tag system.
- Send Your Campaign: When you hit send, your email platform automatically pulls in the unique certificate image for each recipient.
The result is that every single person on your list opens their email to find a beautiful certificate made just for them, with their name and event details rendered perfectly. This kind of personalization really boosts engagement and makes your follow-up feel much more meaningful.
If you're curious about other ways to present these credentials, we've got some great ideas in our article on custom certificates printing. By automating this whole workflow, you can turn a tedious, error-prone chore into a powerful and scalable marketing tool.
Scaling Your Certificate Strategy for Growth
When you move beyond a single event or course, your mindset around certificates needs to shift. You're no longer just creating one-off credentials; you're building a data-driven engine for growth. It’s about creating a system that doesn’t just recognize participation but actively fuels your bigger marketing and business goals.
Once you’re ready to expand, you need a process that can keep up. This means optimizing your designs, making team collaboration painless, and even tapping into global opportunities. The goal changes from simply issuing a certificate to creating a strategic asset.
This is where automation comes in. A simple, powerful flow handles everything from the initial template design to the final delivery.
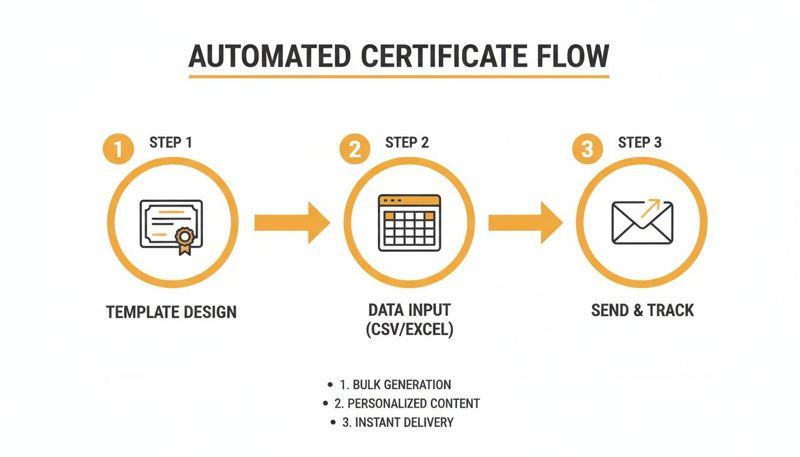
Automating the process removes all the manual bottlenecks, letting you scale your recognition efforts without breaking a sweat.
Using A/B Testing to Optimize Engagement
Which certificate design gets more shares on LinkedIn? Does a bold color palette get more attention than a minimalist one? You don't have to guess. A/B testing your certificate templates is a fantastic way to get real-world data on what actually connects with your audience.
Here’s a simple way to approach it:
- Create Two Variations: Design two different versions of your certificate of participation template. You could test different color schemes, font pairings, layouts, or even the wording.
- Segment Your Audience: Send Template A to half of your participants and Template B to the other half. It's a classic 50/50 split.
- Track the Results: Keep an eye on which version gets more social media shares, link clicks, or even positive email replies.
This data-driven approach helps you fine-tune your designs to maximize their marketing punch. Over time, you’ll land on a proven template that consistently drives the engagement you're looking for.
Streamlining Collaboration for Teams and Agencies
As your organization grows, certificate management can get messy. A marketing agency juggling multiple clients or a large company with several departments needs a way to work together without creating chaos.
This is where collaboration features are a lifesaver. Platforms like OKZest give teams a single dashboard to manage different projects and campaigns all in one place.
A centralized system is the key to brand consistency. It ensures every certificate that goes out is on-brand, eliminating the risk of someone accidentally using an old logo or an unapproved design.
For larger teams, role management is critical. You can assign specific permissions to different users—maybe junior team members can create certificates, but a senior manager has to give the final approval. This kind of structured workflow is essential for maintaining quality and efficiency as you scale. If you want to dive deeper into streamlining your creative process, you can explore how to automate your designs for maximum impact.
Tapping into Global Digital Credential Growth
Thinking globally can unlock massive opportunities. The demand for digital credentials isn't the same everywhere; some regions are seeing explosive growth.
For example, the Asia-Pacific region has become the fastest-growing market for certificate services, with a compound annual growth rate of 16.55%. This boom is driven by things like the rise of cashless payments and new data-localization laws in countries like India, Vietnam, and Indonesia.
For any business with an international audience, this trend is a clear signal. Offering professional, verifiable digital certificates can give you a serious competitive advantage in these high-growth markets. It shows you’re committed to providing real, recognized value that aligns with local professional standards.
By scaling your certificate strategy, you’re not just making things more efficient—you’re positioning your brand for global relevance.
Common Questions About Certificate Templates
Even when the process is straightforward, a few questions always seem to pop up when you're creating certificates. Let's walk through some of the most common ones we hear from people using a certificate of participation template for the first time.
What’s the Best File Format for a Digital Certificate?
This is usually one of the first technical hurdles people run into. For any certificate you plan to email or expect people to share online, PNG is almost always your best bet.
Why? PNGs handle high resolutions beautifully and, more importantly, they support transparent backgrounds. This is a game-changer because it means your design will look sharp and professional wherever it’s displayed, without any clunky white boxes around the edges. When you use an automation tool like OKZest, you’ll typically upload your base design as a PNG, and the platform takes it from there to generate the final personalized images.
Can I Send Certificates from a Virtual Event Platform?
Absolutely. In fact, this is one of the most powerful ways to use certificate automation. Think about it—platforms like Zoom, Hopin, or any other virtual conference software let you export your full attendee list as a simple CSV file.
You can take that exact file and upload it straight into your email marketing tool or an automation platform. A tool like OKZest can then grab the names, emails, and other data from that list to create a unique, personalized certificate for every single person who showed up. It’s a perfect way to blend your event follow-up with a tangible piece of recognition, all inside a single email campaign.
What Happens If Attendee Names Are Missing?
This happens all the time, and it's precisely why fallback values are so important. In any decent-sized list of attendees, you can bet some data will be incomplete. Someone might have registered with just an email, or maybe a name field was left blank in the spreadsheet.
Fallback values are your safety net for imperfect data. They make sure every certificate you send looks professional, protecting your brand from awkward-looking blank spaces.
With OKZest, you can set a default value for any dynamic field. So, if a name is missing from your list, the certificate can automatically display something generic but professional, like "Valued Attendee" or "Workshop Participant." It’s a small detail that makes a huge difference, guaranteeing every certificate looks polished, no matter what your source data looks like. It’s a simple way to maintain quality control when you're working at scale.
Ready to stop creating certificates by hand and start automating your recognition? With OKZest, you can set up your certificate of participation template in minutes, connect it to your attendee data, and send hundreds of personalized credentials automatically.
Start creating for free at OKZest.com