A great certificate of participation is so much more than a simple digital file—it's a seriously powerful tool for engagement and branding. The best ones are designed from the ground up for personalization, letting you automatically swap in names, dates, and other unique details. This simple touch turns a basic acknowledgment into a valued keepsake that people are actually excited to share.

Why Personalized Certificates Are Your Secret Marketing Weapon
Let’s be real: a generic PDF certificate usually gets lost in a downloads folder, never to be seen again. But when you use a personalized template, you’re not just sending a thank you—you’re creating a potent marketing asset that keeps working for you long after your event or course is over.
It all comes down to a bit of human psychology. Seeing your own name on a professionally designed, official-looking document creates a genuine emotional connection. It’s no longer just proof of attendance; it’s a trophy. That small detail makes participants feel seen and valued, which is huge for building brand loyalty.
From Acknowledgment to Advocacy
Think about what happens next. Event organizers and online coaches are catching on to how automated, personalized certificates can drive organic marketing. When someone receives a beautiful certificate with their name proudly displayed, what’s one of the first things they do? They share it on LinkedIn, X (formerly Twitter), or Instagram.
Every single one of those shares is an authentic, powerful testimonial. It’s a free endorsement that showcases your brand’s value to a whole network of like-minded people. This ripple effect creates buzz, boosts your brand's prestige, and attracts new participants—all from one thoughtfully designed certificate.
Key Takeaway: A personalized certificate isn't just an operational chore; it's a strategic marketing touchpoint. It turns your participants into brand ambassadors by giving them something they are genuinely proud to show off.
The Growing Demand for Digital Credentials
This strategy couldn't be better timed. The global certificates market was valued at USD 173.2 million in 2023 and is projected to explode to USD 528.65 million by 2032. A huge driver of this growth is the boom in e-learning, where learners expect digital credentials to prove their new skills.
This incredible growth signals a clear shift. Certificates aren't just for formal education anymore; they've become essential micro-credentials in the professional world.
The Power of Personal Touch
The value of a personal touch isn't just for corporate events. To really get how a personalized document creates a lasting impression, just think about the magic of something like a personalized Nice List Certificate from Santa. Much like that special holiday keepsake, a well-crafted certificate of participation creates a memorable, personal experience that truly resonates.
By automating this, you can deliver these high-impact moments at scale without piling on more work. You turn a simple "thanks for coming" into a lasting, positive brand interaction that continues to deliver value. It’s a low-effort, high-reward tactic that smart marketers are using to stand out.
Comparing Manual vs Automated Certificate Creation
Here's a quick breakdown of the real-world differences between manually creating certificates and using an automated system.
| Feature | Manual Process (Canva or Photoshop) | Automated Process (OKZest) |
|---|---|---|
| Time per Certificate | 5-10 minutes (or more) | Seconds |
| Scalability | Very low; becomes unmanageable with many recipients | High; easily handles thousands of certificates at once |
| Error Potential | High (typos, incorrect data entry) | Low (data is pulled directly from a source) |
| Personalization | Limited and time-consuming | Dynamic and effortless (names, dates, scores, etc.) |
| Distribution | Manual (emailing one by one) | Automated (integrated with email, webhooks, or API) |
| Brand Consistency | Difficult to maintain across batches | Guaranteed; every certificate uses the same template |
While manual tools are great for one-off designs, automation is the only way to go when you need to deliver a professional, personalized experience at scale without losing your mind in the process.
Designing a Master Certificate Template That Looks Official
Your master certificate template is the blueprint. It’s the single design you’ll use to generate every single award, so it needs to be perfect. Think of it less as a background image and more as a strategic asset—it has to look official, reinforce your brand, and be built for easy automation.
When you get this part right, you create something people are genuinely proud to share on LinkedIn or hang on their wall. A great certificate design validates their effort and transforms a simple "thank you" into a real symbol of achievement. The goal is to design it once, then let automation create thousands of unique, personalized versions without you lifting a finger.

Core Elements of an Authoritative Certificate
To feel legitimate, every professional certificate needs a few non-negotiable elements. These are the visual cues that signal professionalism and make the document instantly recognizable as an official award.
- Your Company Logo: Place it prominently, usually top-center or top-left. This is your brand’s stamp of approval.
- A Clear Title: Use a bold heading like "Certificate of Participation" or "Certificate of Completion." No one should have to guess what it is.
- Recipient's Full Name: This is the star of the show. Make sure you leave a large, central space for it.
- The "For" Statement: A short, clear line explaining the achievement. Something like, "For successfully completing the Advanced Marketing Workshop."
- Date of Completion: This grounds the achievement in time and adds another layer of legitimacy.
- Signature and Title: Add a digital signature and the name/title of an authority figure, like your CEO or the lead instructor.
Miss any one of these, and the whole certificate can feel incomplete or less valuable.
Choosing Dimensions and Format for Maximum Shareability
Before you jump into colors and fonts, nail down the size and orientation. This single decision has a huge impact on how well your certificates display on different platforms.
A 16:9 landscape aspect ratio is the undisputed gold standard for digital certificates. It just looks fantastic. It fills modern screens perfectly, shows up beautifully in emails, and shares cleanly on social platforms like LinkedIn without any weird cropping.
For the resolution, I always recommend aiming for at least 150 DPI (dots per inch). This ensures all your text and logos stay sharp and professional, even when zoomed in.
When you're ready to save the master template, a high-resolution PNG file is your best bet. PNGs support transparent backgrounds, which gives you incredible flexibility later on when adding dynamic text layers with an automation tool like OKZest.
My personal tip: Don't crowd the edges. A classic rookie mistake is putting text or logos too close to the border. Give your design some breathing room with generous margins. It looks far more professional and prevents key info from getting cut off on different screens.
Typography and Branding That Speak Volumes
The fonts and colors you pick say a lot about your brand. Your certificate participation template should feel like a natural extension of your company’s visual identity, not a generic afterthought.
Stick to your established brand colors for borders, accents, and important text. This creates a cohesive experience that connects the participant's achievement directly back to your organization.
When it comes to typography, clarity is king.
- For Titles: A bold, elegant serif font (like Cormorant or Marcellus) works wonders to convey a sense of tradition and authority.
- For Names: I find that a clean, readable sans-serif font (like Open Sans or Poppins) is often the best choice, as it handles longer names gracefully.
Try to avoid using more than two or three different fonts. Too many styles will make the design look cluttered and amateurish, which totally undermines the message of recognition.
While our focus here is digital, it helps to think about the prestige of a physical award. Knowing how to order a personalized diploma cover, for example, is all about enhancing the perceived value of the achievement. Apply that same mindset to your digital template. It’s about creating something that feels permanent and valuable, whether it lives on a screen or in a frame.
Using Merge Tags to Bring Your Certificate to Life
Okay, you've got your master design looking sharp. Now, let's turn that static image into a dynamic, personalized asset. This is the moment your beautiful certificate participation template really starts to work for you, and we’ll make it happen with merge tags.
Think of merge tags as smart placeholders. They're the secret sauce that lets an automation platform like OKZest take your single design and generate thousands of unique versions, each one perfectly tailored to the recipient. These tags act as a bridge between your fixed template and the variable data living in a spreadsheet or coming from an API.
Setting Up Your Dynamic Layers
This is where you tell your design which parts need to change for each person. You're not just dropping in text; you're creating intelligent layers that know exactly what information to pull.
For a certificate of participation, the most common dynamic layers are pretty straightforward:
- Participant's Full Name: This is the big one. It’s what makes the certificate a personal award instead of a generic handout.
- Course or Event Title: Specifies what the person actually accomplished, like "Advanced SEO Strategies" or "Annual Marketing Summit 2024."
- Completion Date: Adds the necessary context and turns the certificate into a proper record.
In a tool like OKZest, setting this up is dead simple. You just draw a text box where the name should go and assign it a merge tag, something like {{full_name}}. You'll do the same for every other dynamic piece, essentially mapping each layer in your design to a column in your data source. If you want to get a bit more technical on this, our post on how merge tags work breaks down the mechanics behind it all.
The Overlooked Detail: Fallback Planning
Here's a scenario I’ve seen trip people up more times than I can count: What happens if your data is incomplete?
Imagine sending out a certificate that proudly says, "Congratulations, !" because someone's name was missing from your spreadsheet. It immediately looks broken and careless, completely undermining the professional image you're trying to project.
This is exactly why setting up fallbacks isn't just a good idea—it's a non-negotiable step. A fallback is simply a default value the system uses when the data for a merge tag is missing. It's your safety net, making sure every single certificate looks polished and complete, no matter what your source data throws at you.
Pro Tip: Don't just leave fallbacks blank. This is a chance to be strategic. A thoughtful fallback can maintain a positive and inclusive tone, making sure every recipient feels acknowledged even when you're missing their details.
Here are a few practical examples of fallbacks that actually work well:
- For
{{full_name}}: Instead of a blank space, try something like "Valued Participant" or "Our Honored Guest." - For
{{course_title}}: If the specific title is missing, a more general "Our Recent Workshop" still gets the point across. - For
{{completion_date}}: A fallback could be the month and year of the event, like "October 2024," which provides good context even without the exact day.
This level of detail prevents awkward mistakes and keeps your brand looking professional. It shows you’ve thought through every contingency.
This kind of sophisticated, error-proof automation is exactly what’s driving the massive expansion of the digital certification market. In fact, projections show a compound annual growth rate of 12.50% from 2025 to 2033, all because organizations need reliable tools to create verified credentials that can handle real-world data imperfections. By building fallbacks into your process, you’re not just avoiding errors; you’re adopting a best practice that puts you ahead of the curve.
Generating Personalized Certificates at Any Scale
Okay, your dynamic master template is ready to go. Now for the fun part: turning that single design into hundreds—or even thousands—of unique certificates for every single participant. This is where automation really shines, saving you from a mountain of tedious manual work.
You’ve got two main paths you can take here, and the best one for you really just depends on your needs and how comfortable you are with a bit of tech.
The first is a super straightforward no-code approach. This is perfect for marketers, event organizers, or consultants who just want to get the job done fast without writing a single line of code. The second option is the more powerful API method, which is built for developers or teams who want to wire certificate generation right into their own apps or platforms.
Here’s a quick visual that breaks down the core workflow, from your initial design to the final, personalized certificate.
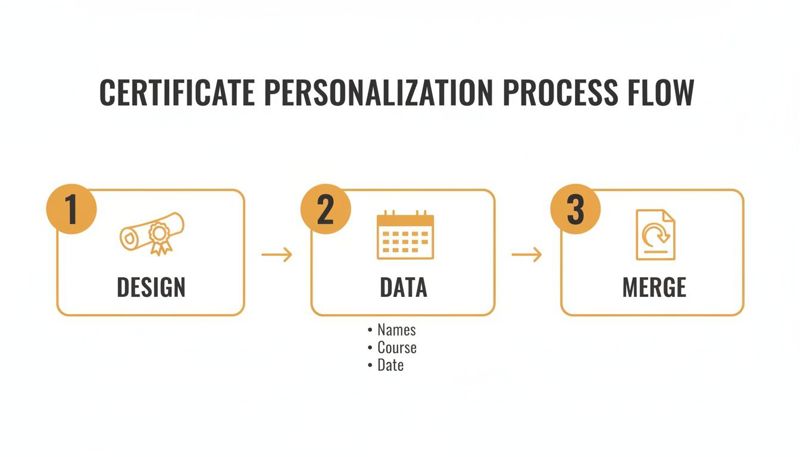
As you can see, it’s a simple process at heart: your template gets combined with your participant data to create personalized certificates, one after another, automatically.
The No-Code Method for Quick Bulk Generation
The no-code path is all about speed and simplicity. It's the go-to solution when you have a list of names from a workshop, webinar, or small conference and need to create all their certificates in one clean batch.
The process itself couldn't be easier. You start with your list of attendees, usually in a simple spreadsheet.
- Get Your Data Ready: Just create a simple CSV file or a Google Sheet. Make sure the column headers match the merge tags you set up in your template, like
full_name,course_title, andcompletion_date. - Upload and Map: In a tool like OKZest, you just upload that file. The system will read the columns and ask you to match them up with the right dynamic layers on your certificate template.
- Generate and Download: Click a button, and the platform will churn through every row in your spreadsheet, creating a unique certificate for each person. You can then download them all in a zip file.
For instance, a marketing agency running a quarterly client workshop can just export their attendee list, upload it, and have over 100 personalized certificates ready to send out in less than five minutes. What used to be a mind-numbing task becomes a quick, satisfying win.
Using an API for Real-Time Automation
For teams that need a more integrated, hands-off solution, the API method is the way to go. This is ideal for learning management systems (LMS), online course platforms, or event apps where certificates need to be created instantly, right when a user completes an action.
Instead of uploading a file, your own application sends a request directly to the certificate generation service. This request carries the data for one certificate—like the user's name and the course they just finished. The service instantly generates the personalized image and sends back a URL.
This opens up a ton of possibilities for real-time engagement.
- Instant Gratification: A student passes their final quiz, and a personalized certificate immediately appears on their dashboard. No waiting.
- Seamless Integration: An attendee checks out of a virtual conference, and a personalized certificate of participation lands in their inbox moments later.
- Dynamic Content: You can even include dynamic QR codes that link to a unique verification page, adding a professional layer of authenticity to each award.
This level of integration is a game-changer for larger operations. If you're looking to scale up, it's worth learning more about how personalized image automation works for enterprises and how it can be applied to more than just certificates. The API method transforms your certificate from a static document into a living, integrated part of your user experience, delivering that little hit of validation at the perfect moment.
How to Distribute Your Certificates for Maximum Impact
You've designed a dynamic, personalized certificate. That's a huge win. But a brilliant design has zero impact if it never actually reaches your audience. The final, critical piece of the puzzle is distribution.
Getting these unique images into the right hands—quickly and effectively—is what transforms them from a nice idea into a memorable experience. This is where your certificate automation tool plugs directly into your marketing channels. Let’s walk through the best ways to make sure every participant sees and shares their personal award.
Supercharge Your Email Campaigns with Personalized Certificates
Email is still the undisputed king of direct communication, making it the perfect channel to deliver your certificates. Forget attaching a generic PDF that gets ignored. Instead, embed a personalized image directly into the body of the email. This creates a powerful "wow" moment the instant a recipient opens it.
The process is remarkably simple with an automation tool like OKZest. After generating your batch of certificates, the system gives you a unique image URL for each person. This URL acts as a merge tag in your email service provider (ESP), whether you use Mailchimp, Klaviyo, or something else.
Here’s a quick look at how it works when you're building your email template:
- Map the URL: In your ESP, you map the unique certificate image URL from your data source to a custom merge tag (e.g.,
*|CERT_URL|*). - Insert the Image: In your email's HTML, you just use that tag as the image source:
<img src="*|CERT_URL|*">. - Send Your Campaign: When you hit send, your ESP dynamically swaps the merge tag with the correct URL for each recipient. Everyone sees their own personalized certificate, automatically.
This simple method turns a standard follow-up email into a highly personal and visually engaging piece of content. And it couldn't be more timely. With the growing importance of professional recognition, people are more likely than ever to appreciate these credentials. In G7 countries, the professional certificates market is expanding fast, with user penetration expected to grow from 2.2% in 2025 to 3.3% by 2030. This trend, which you can explore further on Statista, highlights just how much value people place on validating their skills.
Embed Certificates on Your Website for a Premium Experience
Another high-impact strategy is to create a personalized landing page or a dynamic section on your website. Imagine a participant finishing an online course and being immediately directed to a "Congratulations!" page where their certificate—complete with their name—is already waiting for them.
This creates a seamless and seriously impressive user experience. It provides instant gratification and makes the achievement feel integrated and significant. This is especially powerful for membership sites or learning platforms where you want to foster a sense of accomplishment and community.
Key Insight: Delivering the certificate directly within your own ecosystem (your website or app) keeps the user engaged with your brand at the peak of their positive emotion, strengthening their connection to your organization.
Creative Distribution Tactics for a Personal Touch
While email and web are powerful workhorses, don't overlook more direct and personal channels. These methods can create unforgettable moments that generate serious buzz.
- Social Media DMs: Sending a personalized certificate via a direct message on LinkedIn or X (formerly Twitter) after a great interaction is a fantastic high-touch gesture.
- WhatsApp Messages: For smaller, high-value groups like a coaching cohort, sending certificates through WhatsApp feels immediate and genuinely personal.
- Post-Event Portals: Include a link in a post-event resource portal where attendees can log in to view and download their personalized certificate alongside other materials.
These tactics cut through the noise. They show you're willing to go the extra mile to recognize someone, and that's how you turn participants into true brand advocates. And while these digital certificates look great on screens, our guide on preparing custom certificates for printing can help you offer a physical option as well.
Common Questions About Certificate Templates
Once you start thinking about moving from a one-off, static certificate to an automated system, a few practical questions always pop up. I've seen them time and time again. Getting these sorted out early will save you a ton of headaches and help you build a much more professional process right from the get-go.
What Is the Best Format for a Certificate Participation Template?
For the master template you’ll upload to a tool like OKZest, a high-resolution PNG is your best friend. Why? Its support for transparency is a game-changer. It gives you all the flexibility in the world when you start layering dynamic text and other elements on top of your beautiful design.
When it comes to size, stick to the industry standard: a 16:9 landscape aspect ratio. It just looks right—perfect for emails, web pages, and sharing on professional networks like LinkedIn. To keep everything looking sharp and professional, make sure your design has a resolution of at least 150 DPI.
Can I Connect My CRM Directly to Generate Certificates?
Absolutely. And honestly, this is where the real magic happens. While uploading a CSV file is super simple for batch jobs, an API is the way to go for a truly scalable, hands-off system. An API lets you hook your CRM, event software, or online course platform directly into the certificate generator.
Imagine this: the moment a student finishes a course or an attendee's badge is scanned at an event, their personalized certificate is automatically created and sent. It's instant gratification for them and zero manual work for your team.
Expert Tip: A classic problem I see all the time is how to handle unexpectedly long names that throw off a perfectly good design. The best tools have this figured out. They offer automatic text handling that lets you set a rule—if a name is too long, the font size simply shrinks to fit within the space you've defined.
How Should I Handle Names That Are Too Long?
Here’s a pro-tip from my own experience: solve this problem before it even starts. When you're first designing your certificate participation template, be generous with the horizontal space for the name field.
It’s such a simple thing, but making that area as wide as you can will gracefully handle the vast majority of names without needing any clever text-shrinking tricks. This keeps the design looking consistent and elegant for every single recipient.
Are These Digital Certificates Secure and Verifiable?
A personalized image is a great form of recognition, but you can easily add a powerful layer of verifiability to it. The most effective method is to include a dynamic QR code on each certificate.
This isn't just any QR code. It can be unique to each person, linking to a dedicated validation page on your website. That page can confirm the participant's name, the course or event they completed, and the date. This simple addition turns a beautiful design into a verifiable credential with real-world value.
Ready to stop creating certificates one by one and start automating a process that truly wows your audience? With OKZest, you can design a beautiful master template and generate thousands of personalized certificates in minutes, not hours. See how easy it is to bring your certificates to life at https://okzest.com.