You’ve got the spreadsheet. You’ve got the design. You might even have the email campaign scheduled. But the last mile is where many find themselves stalled.
The usual workflow looks simple until it isn’t. You upload a CSV, generate a batch of images, and then notice missing headshots, blank company names, or a campaign that needs live data after the send has already gone out. That’s where static image generation starts to break down.
To create dynamic images from spreadsheet data properly, you need more than a one-time merge. You need a setup that handles live personalization, protects you from bad data, and gives you a reliable way to use those images in emails and on web pages without sending broken visuals.
Beyond Text Personalization The Case for Dynamic Images
A prospect opens your email, and the first thing they see is their company name inside the graphic, their logo pulled in live, and a QR code that still works even if the underlying data changed an hour ago. That gets attention faster than a first-name merge tag in the subject line, and it solves a different problem. Visual personalization carries context at a glance.
Text personalization is common now. Dynamic images give marketing teams more room to personalize the part people notice first. Event teams use them for invites and badges. Sales teams use them for account-based outreach. Customer teams use them for onboarding, milestones, and renewal reminders that feel specific instead of mass sent.

Why image merge tags matter
Dynamic images work like merge tags placed directly inside the design. Instead of changing only {{firstName}} in a text block, you can swap names, photos, logos, QR codes, offer details, pricing, or account data inside the image itself.
That changes how the message is received. Personalization is visible immediately, which is especially useful in crowded inboxes and on busy landing pages where people scan before they read.
Common use cases include:
- Event marketing: attendee name, company, session title, and QR code in one banner
- Email outreach: rep photo, prospect company name, and a relevant visual
- Web personalization: different hero images based on user or account data
- Certificates and recognition: recipient name, award title, and issue details
- Social and community campaigns: individualized graphics generated from one template
The web side often gets less attention than email, but it matters just as much. If you’re also personalizing landing pages, this guide on dynamic content for website is a useful companion because the same principle applies. Render the experience with current data instead of relying on a one-time build.
Live data and fallbacks matter more than batch output
Many guides stop at batch generation. They show a spreadsheet upload, an export button, and a folder full of finished images. That approach works for one-off sends, but it starts to strain when campaigns run continuously, data changes after send time, or records arrive with gaps.
The bigger gap in many tutorials is the lack of attention to live data and fallback logic. High-volume email and web personalization need images that can be generated at request time, not only in advance. They also need rules for missing photos, empty company fields, expired URLs, and late-arriving records. Without those rules, personalization breaks at the exact moment it should help.
At OKZest, that’s the difference I usually see between a demo that looks good and a campaign that keeps working in production. A static batch can cover the happy path. Real campaigns need current data, predictable rendering, and sensible defaults.
Broken images don’t just look sloppy. They signal that your process cannot handle imperfect data.
If you want a clearer picture of how this works in practice, see our guide to dynamic images for email and web personalization. The key idea is simple. Create images that respond to live inputs, and set fallbacks so every recipient still gets a complete visual even when one field is missing.
Prepare Your Spreadsheet for Image Generation
The spreadsheet is the engine. If the data is messy, the image output will be messy too.
A strong file is boring in the best way. Clear headers. Consistent formatting. No mystery columns. No special characters that turn merge tags into debugging sessions. If you want image generation to feel easy later, keep the spreadsheet strict now.
Use simple headers and predictable values
Your column names should read like field names, not labels for humans. Keep them short and stable. If a field is an image URL, say so in the header. If a field feeds a QR code, name it that way.
Use this structure as a starting point:
| Sample Spreadsheet Structure for Dynamic Images |
|---|
| firstName |
| companyName |
| profileImage_url |
| qr_code_data |
| fallback_text |
That’s intentionally plain. It maps cleanly to merge tags and keeps the template readable.
A few rules help:
- Keep headers clean: use
firstName, not “First Name” or “First-Name!” - Stick to one data type per column: don’t mix image URLs and text notes in the same field
- Format repeated fields consistently: if one row uses full names and another uses initials, the design will feel uneven
- Store image assets reliably: if you’re using profile photos or logos, make sure the URLs are accessible and stable
Build for the output you need
Different campaigns need different spreadsheet structures. An event badge might need a name, role, company, and headshot. A sales image might need account name, rep name, meeting time, and a logo. A client welcome image might need plan name, next step, and a fallback greeting.
Here’s a practical way to frame this:
- Start with the finished image in mind.
- List every piece of dynamic content visible in that design.
- Give each one a dedicated column.
- Add one extra column for any fallback text or alternate asset you may need later.
Practical rule: If a designer can point at an element in the image, you should be able to point at the exact spreadsheet column that controls it.
Clean data before you design
Most rendering problems aren’t design problems. They’re data problems.
Before you map anything, scan for the issues that usually cause trouble:
- Blank cells: especially for names, logos, and profile photos
- Special characters: these can break mappings or API payloads later
- Long text: job titles, offer names, and event titles often overflow
- Bad URLs: one broken image URL can ruin an otherwise good campaign
If you’re importing from a CRM or form tool, normalize the data first. Trim whitespace. Fix capitalization. Make sure every URL is what you think it is. That upfront cleanup saves a lot of frustration once you begin to create dynamic images from spreadsheet data at scale.
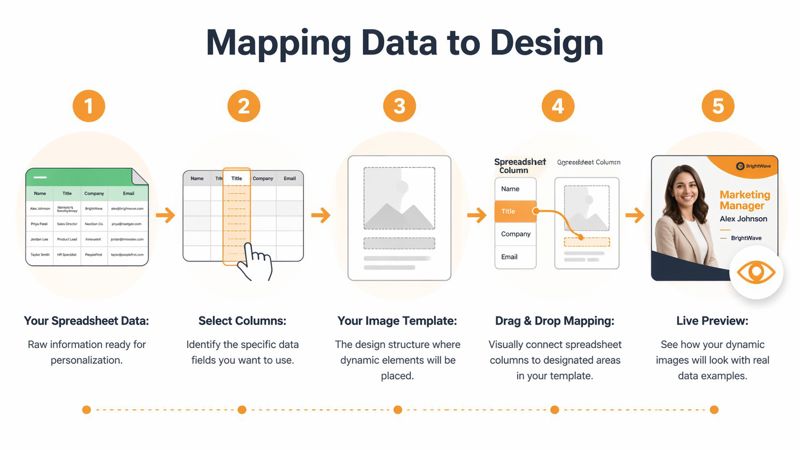
Map Spreadsheet Columns to Your Image Template
Mapping is where a spreadsheet stops being a data file and starts driving a real image system. Each text box, logo slot, headshot, or QR code in the template needs one clear source field. Get that relationship right and the same design can serve thousands of recipients, or update in real time from a live feed, without rebuilding the artwork.
Older Excel-based methods could handle image swaps, but they relied on careful cell placement, named ranges, and formulas like =INDIRECT(C1&"_pic"). That approach still has uses for internal dashboards. It is less practical for email and web personalization, where assets need to render reliably from changing data and recover cleanly when a field is missing. A visual mapping workflow cuts the setup work and makes live image generation much easier to maintain than spreadsheet formula chains.
Start with the template’s job
Map only the fields the image needs to do its job.
For an event invite, that might be:
- recipient name
- company name
- profile image
- QR code
- alternate greeting
That structure keeps the output readable and gives each layer a purpose. In practice, tighter templates perform better because they are easier to QA, easier to reuse, and less likely to break when live data changes mid-campaign.
If you need inspiration for how a reusable visual layout works, this overview of a photo template is a useful reference point. The key idea is consistent structure with variable content.
Bind one layer to one field
A clean mapping setup is simple to explain and easy to audit later. One layer should usually pull from one column. If a text area needs several values, combine them upstream in the spreadsheet or data feed instead of forcing the template to do too much.
A practical workflow looks like this:
Choose the base design
Set the fixed background, brand elements, and static copy first.Map text layers
Connect headline, name, or company fields to the matching spreadsheet columns such asfirstNameorcompanyName.Map image layers
Point logo or headshot layers to URL fields likelogo_urlorprofileImage_url.Map generated elements
Bind QR codes, barcodes, or offer codes to their own dedicated fields.Preview with several real records
Use a clean row, a row with long values, and a row with missing values. That test matters more than a perfect demo record.
OKZest’s guide to merge tag images shows this kind of field-to-layer mapping in practice, especially when image elements are populated directly from data instead of assembled by hand.
Design for live data, not just batch exports
This is the part many guides skip. Batch generation is useful, but high-volume campaigns often need the image to reflect current data at open time or page load. A rep changes. An event time updates. A product image expires. If the template is mapped cleanly, those updates can flow into the image without redesigning the asset set.
That changes how you should map fields. Use stable column names. Keep image aspect ratios consistent. Avoid stuffing long CRM values into small text areas. Plan for values that arrive late, change often, or fail occasionally.
Common mapping decisions that affect results
What usually works:
- Short fields with one clear purpose
- Defined safe areas for names and titles
- Consistent dimensions for logos and photos
- Layer names that match the data they use
What causes trouble:
- Headers that almost match, but not exactly
- One text box carrying multiple ideas
- Mixed image shapes without cropping rules
- Templates built for perfect rows only
I use a simple rule here. If a designer points to a layer, the marketer should be able to point to the exact column that controls it.
Well-mapped templates are reusable assets. Swap the spreadsheet, connect a live source, or trigger images through automation, and the visual system stays intact.
Mastering Fallbacks for Flawless Campaigns
Fallbacks are the difference between a clever demo and a dependable campaign.
Most real datasets have gaps. A customer doesn’t provide a company logo. A form submits without a first name. A profile photo URL expires. If you don’t plan for that, the generated image exposes the problem immediately.
The fallback mindset
A fallback is a default action for missing or unusable data. It can be text, an alternate image, or the decision to hide a layer completely.
That sounds minor, but it changes how safe your campaign is. Instead of hoping every row is complete, you assume some rows won’t be and design for it.
Useful fallback patterns include:
- Missing first name: show “Hi there!” instead of a blank greeting
- Missing logo URL: use a generic icon or remove the logo frame
- Missing profile photo: swap in a neutral avatar
- Missing event detail: replace the field with a broader message that still makes sense
Choose a fallback that preserves trust
Not every fallback should be visible. Sometimes the right move is to replace missing content. Other times it’s better to hide the layer so the image still looks intentional.
Use a simple decision rule:
| Situation | Better fallback |
|---|---|
| Personal greeting missing | Default text |
| Logo missing | Generic icon or hide layer |
| Photo missing | Default avatar |
| Optional extra detail missing | Remove that element entirely |
A poor fallback calls attention to the missing data. A good fallback makes the design feel complete anyway.
Field check: If a dynamic element can be empty, decide now whether the right answer is replace, hide, or simplify.
Test the ugly rows, not the perfect ones
Teams often preview the cleanest sample record and call it done. That doesn’t tell you anything useful.
Test the rows with the longest names, the blankest fields, the weakest image URLs, and the weird capitalization. If the template survives those, it’s ready. If it only works with pristine demo data, it isn’t production-ready yet.
This matters most in high-volume email and web personalization. Once an image is live, recipients don’t care whether the blank spot came from the spreadsheet or the template. They only see a broken experience.
Generate and Embed Images in Emails and Web Pages
Once the template works, you have two practical ways to use it. You can generate image files in bulk, or you can embed a live image URL that renders with recipient data at the moment it’s requested.
Both approaches have value. The right one depends on whether the image content is fixed at send time or needs to stay dynamic after the campaign goes out.
Bulk generation for fixed assets
Bulk generation is the straightforward option. You upload the spreadsheet, render all rows, and download the finished files.
That works well for:
- certificates
- conference speaker graphics
- social media assets
- one-off campaign images
- print-ready visuals
The strength of this method is control. You get the files, inspect them, and use them wherever needed. It’s ideal when the data won’t change after export.
According to RenderForm’s spreadsheet image generation guide, email campaigns using dynamic, personalized images see 29% higher open rates and 41% higher click-through rates, contributing to an average $38 ROI for every $1 spent on email marketing. The same source notes that bulk generation tools can produce hundreds of visuals in under two minutes, while real-time API integration is what drives ongoing engagement use cases at scale.
Live embedding for real-time personalization
Live embedding is more powerful because the image isn’t a static file sitting in a folder. It’s a URL that behaves like an image merge tag.
You place that URL into your email platform or webpage, and when the image loads, the system uses the recipient or page data to generate the visual on the fly. That gives you a cleaner path for campaigns where details may change late or need to be personalized per view.
A practical email workflow usually looks like this:
- Create the image template.
- Connect the dynamic fields.
- Generate a unique image URL pattern.
- Paste that URL into your ESP image block or HTML.
- Let the merge fields populate per recipient.
This approach fits platforms like Mailchimp and Klaviyo because the image URL can work alongside the same merge data already used in the message body.
Don’t ignore file weight and rendering quality
Email and web delivery still depend on sensible image handling. Personalization won’t help if the image is too heavy, too blurry, or poorly cropped on mobile.
If your campaign includes landing pages or embedded visuals, this guide on how to optimize images for web is worth reviewing. The core principle is simple. Keep images sharp enough to look professional, but light enough to load reliably.
A dynamic image only performs if it renders cleanly where the recipient sees it. Speed and clarity matter as much as personalization.
For web pages, embed the image in standard HTML and pass the needed dynamic values through the URL or connected data source. For email, test across clients before launch, especially when using profile photos, QR codes, or longer text fields.
Scale with the OKZest API and Automation
A spreadsheet works well for planned batch jobs. Real-time personalization usually starts somewhere else. A form submission, CRM update, product event, or pricing change can all trigger a fresh image render the moment the data changes.
That matters when the image needs to reflect live information instead of yesterday’s export. For email, web, and app experiences, an API-driven setup gives you tighter control over timing, data quality, and fallback behavior.
What the automated flow looks like
A practical workflow starts with an event. Someone signs up, reaches a milestone, updates a profile, or lands on a page. The workflow collects the fields the template needs, checks that each value is usable, requests the render, and returns an image URL to the system that will display it.
The sequence is simple:
- Receive a trigger: webhook, app event, form post, or scheduled job
- Prepare the payload: map fields, clean text, and confirm image URLs or asset IDs
- Render the image: send the request to OKZest and get back the generated image URL
- Pass it downstream: insert that URL into your email platform, CMS, app, or webpage
For a more technical example of how this fits into production systems, see OKZest’s guide to using an image templating API.
Why API workflows hold up better
The main advantage is consistency under load.
Spreadsheets are useful, but they often introduce avoidable problems once multiple systems start feeding the same campaign. Headers drift. Date formats change. Image links break. A JSON payload from your automation layer is easier to validate before the render step, which means fewer bad images reaching the customer.
I generally recommend API-based rendering when any of these are true: the data changes frequently, the same template is used across several channels, or the campaign needs to respond to user behavior in real time. In those cases, generating images from a live feed is more dependable than exporting and re-uploading rows throughout the day.
Fallback logic matters just as much as automation. If a profile photo is missing, the workflow should swap in a default asset. If a name is blank, use a safe generic label. If a field arrives in the wrong format, stop that record or correct it before requesting the image. That is what keeps high-volume personalization stable.
Common failure points in automation
The failure patterns are predictable, which is good news because they are also fixable.
| Problem | Likely cause | Better approach |
|---|---|---|
| Missing values | upstream data gaps | define fallback values before render |
| Bad characters | unescaped CSV or form input | sanitize strings in the workflow |
| Oversized assets | source images too large | resize or constrain assets before passing them |
| Slow runs on large jobs | trying to process too much at once | queue, paginate, or trigger in smaller batches |
The teams that get the best results treat image generation like any other production service. Validate inputs, keep field names consistent, log failures clearly, and build sensible defaults for anything that may be missing. That extra setup pays off quickly once personalized images are being generated continuously instead of in one-off batches.
Troubleshooting Common Image Generation Issues
Most problems fall into a small handful of categories. The fix usually becomes obvious once you know where to look.
When text looks wrong
If text overflows, the cause is usually one of two things. The field contains more characters than the layout can support, or the text box is too tightly designed for real-world data.
Try these fixes:
- Shorten the source field: trim long titles or company names before rendering
- Adjust the layout: give high-variance fields more space
- Set text rules: use a smaller size or fewer words for known problem fields
When images look bad or don’t appear
Blurry output usually starts with the template asset. If the base image is low quality, the generated result will be too. Missing images usually point to a bad URL, restricted asset access, or a mismatch between the spreadsheet header and the mapped layer.
Check these first:
- Header match: your field name and merge tag must align exactly
- Asset quality: use strong source images for the base design
- URL validity: test image URLs directly before launch
Test one clean row and one messy row every time. That catches most failures before your audience does.
When the data doesn’t map
If the wrong values show up, or nothing shows up, the issue is often a naming mismatch. Recheck headers, merge tags, and any automation step that may rename fields.
Start small. Render one record with only the essential fields. Once that works, add the rest back in one layer at a time.
If you want a practical way to create dynamic images from spreadsheet data for email, websites, certificates, and other personalized campaigns, OKZest provides both no-code and API-based image generation with support for live data and fallback values.