Email image personalization is about swapping out parts of an image inside your email to show something unique to each person who opens it. This creates a true one-to-one experience by dropping details like a person's name, company, or loyalty points right into the visual, making every email feel like it was made just for them.
Why Generic Email Is Costing You Customers
Let's be honest—the days of blasting one-size-fits-all emails are long gone. Today's customers don't just prefer personalization; they flat-out expect it. A generic email is easy to ignore, blending into the background of an already crowded inbox. It screams a one-to-many message, making subscribers feel like just another number on your list.
This approach misses a massive opportunity to build a real connection. When you fail to acknowledge your customer's individuality, you're not just losing their attention—you're actively damaging brand loyalty and leaving money on the table.

The Power of Seeing Your Name in Lights
Imagine the difference between two emails from a travel agency. The first shows a generic stock photo of a beach with the headline, "Summer Deals Are Here!" The second displays an image of a boarding pass with the recipient's name, "Sarah Smith," printed right on it, for a flight to Bali—a place she was just browsing on their site.
That second email does more than just advertise; it creates a genuine "wow" moment. The psychological hook of seeing your own details within an image fosters an immediate connection that cuts through the noise. It transforms a passive ad into an engaging, personal invitation.
By shifting from generic visuals to personalized ones, you move from shouting at a crowd to speaking directly to an individual. This simple change can be the difference between an email that gets deleted and one that drives a sale.
The Tangible Impact on Your Metrics
The data more than backs this up. Personalized email images have become a critical tool in modern email marketing. For starters, emails that include any image see a 1.12% higher click-through rate than plain-text versions. When you layer in personalization, the results are explosive.
Marketers who implement segmented personalization strategies, including customized visuals, have reported up to a 760% increase in email revenue. Personalized emails also boast an open rate of 44.3%, compared to just 39.13% for non-personalized campaigns. You can dig into more personalized email marketing statistics to see the full picture.
These numbers paint a clear before-and-after story for your campaigns:
- Before: Low engagement, high unsubscribe rates, and missed revenue.
- After: A significant lift in clicks, higher conversion rates, and much stronger customer relationships.
Ultimately, email image personalization is no longer a "nice-to-have." It's an essential strategy for any business looking to squeeze every drop of ROI out of their email marketing and build a brand that resonates on a personal level.
Designing Your First Dynamic Image Template
Alright, this is where the magic happens. You're about to bridge the gap between your creative ideas for email image personalization and making them a reality. Creating a dynamic template is more than just slapping some text on a background; it’s about thinking like a designer to make sure every personalized piece feels like it truly belongs.
Let’s walk through a real-world scenario. Say you’re an event manager creating custom digital tickets. The goal is to send every attendee a unique, professionally designed image. Your starting point is the base image—a branded ticket stub with your event's logo and colors. This static background sets the stage for all the dynamic bits you'll add on top.
Once your base image is sorted, it's time to layer on the personalized elements. In a tool like OKZest, this is a really intuitive process. You simply add dynamic layers for the key pieces of information you want to pull in.
For our ticket example, that would mean adding layers for:
- Attendee Name: The most obvious and impactful personalized field.
- Seat Number: Adds specific, real value for the attendee.
- Unique QR Code: Provides a functional, one-to-one element for scanning at the door.
Each of these layers is just a placeholder waiting for your data. You can position them exactly where you want, pick fonts that match your branding, and choose colors that work with the background. The goal is to make them look completely integrated, not just stuck on as an afterthought. For a deeper dive into the design process, you can check out our guide on no-code image design automation.
Choosing Fonts and Colors
One of the most common mistakes I see is people using default fonts that completely clash with their beautiful base image. Don't let that be you.
Take a moment to pick a font that fits the vibe of your event—whether that’s modern, formal, or a bit more playful. Just as important, make sure the text color has enough contrast to be easily readable while still looking like it belongs. A great pro-tip is to pull a color directly from your logo or base image using a color picker.
Here’s a look at the design interface in OKZest, which shows how you can visually combine a base image with dynamic text layers. This visual editor gives you precise control over the placement and styling of every personalized element right on the canvas.
The Importance of Fallback Values
So, what happens if your data is incomplete? Let's say you're missing an attendee's name. Without a backup plan, you could end up sending an email with a ticket that says "Hi, !" which looks broken and unprofessional. This is exactly why fallback values are an absolute must.
For every dynamic layer, you can set a default value to be used when the primary data is missing. For instance:
- If
[FirstName]is missing, your fallback could be "Valued Guest." - If
[SeatNumber]is unavailable, it could simply show "General Admission."
Fallbacks are your safety net. They guarantee that every single recipient gets a polished, complete-looking image. This protects your brand's reputation and ensures a consistent experience, even when you have a few gaps in your data.
Thinking ahead like this is a cornerstone of creating personalized assets that can scale. If you really want to understand the power of dynamic templates, it's worth exploring concepts like dynamic creative optimization (DCO), which takes these ideas to the next level for large-scale advertising. By designing your templates with both personalization and potential data issues in mind, you’re building a robust asset ready for any campaign.
Connecting Data to Power Your Personalization
Your dynamic image template is ready to go, but it’s just a shell without the right data to bring it to life. Think of data as the fuel for your personalization engine. Let's walk through how you can connect your data sources, starting with the most straightforward methods and building up to real-time automation.
A common starting point, especially for one-off campaigns, is a simple CSV file. If your data already lives in a spreadsheet, this is for you. For instance, a coach running an online course could export a list of graduates with their names and completion dates. Uploading that single CSV to a tool like OKZest can instantly generate hundreds of unique, personalized certificates. It’s incredibly efficient for batch jobs.
This diagram breaks down how a dynamic image is built—starting with a solid base, adding flexible layers for your data, and planning a safety net with fallbacks.
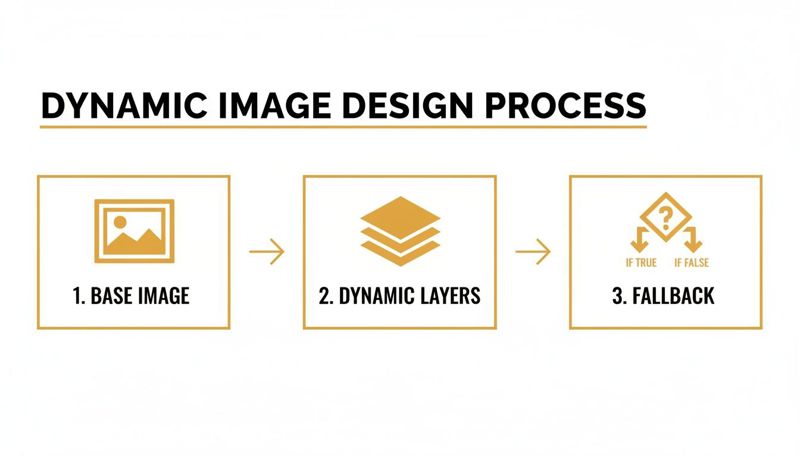
As you can see, the process is about creating a solid visual foundation first, then layering on the dynamic elements that will change for each person.
Moving to Automated Connections
While CSVs are great, the real magic happens when you automate the data flow. This is where you connect your image personalization platform directly to your CRM, e-commerce platform, or other tools where customer data lives.
This approach cuts out the manual work of exporting and uploading files. You could, for example, link directly to your HubSpot or Salesforce account. Now, when a new lead comes in or a customer's status changes, that information is instantly available for personalization. It’s a "set-it-and-forget-it" method that keeps your images consistently relevant without any extra effort.
The goal is to make your image templates "live." Instead of generating images ahead of time, they are created on-the-fly the moment a user opens their email, pulling the most current data available.
Real-Time Magic with API Integration
For the most immediate and powerful personalization, an API connection is the way to go. This might sound overly technical, but many modern tools have made it surprisingly simple, often not even requiring a developer.
Imagine a SaaS company that wants to send a welcome email the very second a user signs up. With an API, the sign-up form can send the new user's data directly to the image personalization tool in real time. The resulting welcome email can feature a dashboard mockup with the user’s name and company logo already in place. This creates a powerful "wow" moment that shows the value of your product from the very first interaction.
This kind of real-time connection works with any data you collect, including the zero-party data that customers share with you directly. If you want to learn more about how to collect and use this valuable information, check out our guide on what zero-party data is.
Ultimately, wiring up your data sources—whether through a simple upload or a sophisticated API—is what turns a static template into a dynamic experience that resonates with every single recipient.
Embedding Personalized Images in Your Email Platform
You’ve designed a great-looking template and hooked up your data. Now it’s time for the final piece of the puzzle: getting those dynamic images into your actual email campaigns. This is where the magic happens and you turn a generic broadcast into a one-on-one conversation.
The whole process revolves around a special URL that works like a merge tag, but for images.
Instead of uploading a static JPG or PNG file, you'll insert a unique link from your image personalization tool (like OKZest). When your subscriber opens the email, their inbox instantly "calls" that URL. The service then generates the personalized image on the fly—pulling in the right data for that specific person—and serves it up. It all happens in a blink.

A Walkthrough for Major Email Platforms
Let's break down what this looks like in the real world. The good news is that most Email Service Providers (ESPs) handle this in a nearly identical way, using their standard merge tags or personalization tokens.
For Klaviyo:
- Drag an image block into your email template.
- Instead of uploading an image, choose the option to insert from a URL.
- Paste your base image URL and add Klaviyo’s personalization syntax. For example:
https://app.okzest.com/image.png?name={{ first_name|default:'there' }}
For Mailchimp:
- Add an image block to your design.
- Click "Upload an Image" and then flip over to the "Import from URL" tab.
- Enter your image URL, but this time using Mailchimp’s merge tags:
https://app.okzest.com/image.png?name=*|FNAME|*
For Instantly:
- While writing your email sequence, click to insert an image.
- Use the URL option and build your link with Instantly’s variables:
https://app.okzest.com/image.png?name={{firstName}}
See the pattern? The core idea is the same no matter where you send your emails. You’re just telling the ESP to construct a unique image URL for every single person on your list by pulling data from their contact profile.
If you want to dig deeper into the technical side of how this URL-based method works, our guide to the email image templating API has all the details.
Best Practices for Embedding Your Images
Getting the image into the email is one thing, but making sure it delivers a great experience is another. A few simple best practices can make a huge difference in your campaign's performance.
One of the most powerful and overlooked tricks is to personalize your image’s alt text. Instead of a generic description like "Welcome banner," you can use merge tags to make it specific, like "A custom welcome image for Sarah." This is a huge win for accessibility, but it also helps recipients who have images blocked by default know exactly what they’re missing.
This level of detail pays off. Recent data shows that automated emails with personalized elements hit a 5.58% average click rate, with the top campaigns reaching an incredible 10.48%. Compare that to the 1.69% click rate for standard broadcast campaigns—that’s a 3.3x performance lift.
Even better, those personalized flows drive an average of 2.11% placed orders, while generic campaigns lag far behind at just 0.16%.
Measuring the ROI of Your Personalized Campaigns
You’ve designed a beautiful personalized image and have it ready to go. But how do you actually know if it's working? A great campaign isn't just about looking good; it's about proving its impact on the bottom line.
This is where testing and measuring come into play. It’s how you turn a creative idea like email image personalization into a strategy that directly contributes to your business goals.
The Essential Pre-Flight Checklist
Before any campaign sees the light of day, you have to run it through a pre-flight check. This just means sending a bunch of test emails to yourself and a few colleagues. Your job here is to be your own harshest critic and catch any hiccups before your subscribers do.
You're mainly hunting for two things: broken images and bad data. I always recommend sending tests for every possible scenario—contacts with all their data filled in, some with partial data, and even a few with intentionally blank fields. This is the only way to see if your fallbacks are truly working.
Check every single detail:
- Image Loading: Does the image pop up correctly? How fast does it load on a phone versus a desktop?
- Data Accuracy: Is the right first name and company showing up for the right person? A simple mix-up can look really unprofessional.
- Fallback Performance: When a name is missing, does your friendly "Valued Guest" text appear, or are you left with an ugly
[BLANK]space? - Link Functionality: A simple but crucial one. Does clicking the image actually go to the correct landing page?
Catching one broken link or data error at this stage can save you a mountain of embarrassment and protect your brand's reputation with thousands of people.
Moving Beyond Open Rates
Once your campaign is out in the wild, it’s time to measure what really matters. Open rates are fine for a quick glance, but they don't tell you the full story. The real magic of personalized images is how they get people to act.
The most crucial metric is the click-through rate (CTR) on the personalized image itself. This isolates the image's performance and shows you exactly how many people were compelled to act because of the visual you created for them.
Keep a close eye on these key performance indicators (KPIs):
- Image CTR: The percentage of people who clicked specifically on your personalized image.
- Conversion Rate: Of those who clicked the image, how many actually did the thing you wanted them to do (like buying a product or signing up for a webinar)?
- A/B Test Results: This is the gold standard. Pit your personalized image against a generic version in a classic split test.
An A/B test gives you undeniable proof. When you can confidently walk into a meeting and show that the version with email image personalization drove a 25% higher click-through rate and a 10% lift in conversions, you’ve built an ironclad business case. That’s the kind of data that demonstrates real ROI and gets you the budget for even more ambitious campaigns.
Common Questions About Email Image Personalization
Jumping into something new like email image personalization is exciting, but it's totally normal to have a few questions. After all, you're dealing with customer data, deliverability, and your creative work all at once. Let's tackle some of the most common questions we hear so you can get started with confidence.
Many marketers get a little nervous thinking about what happens when their data isn't perfect. It's a great question—sending an image that says "Hi, !" is the last thing anyone wants. It just looks sloppy.
What Happens If I Don't Have Data Like a First Name?
This is exactly where fallbacks come in to save the day. A professional image personalization platform like OKZest is built with this exact scenario in mind. When you design your image template, you can set a default or fallback value for any part that changes.
For example:
- An image meant to display
Hi, [FirstName]!can be set to showHi, there!if the name data is missing. - A personalized offer for someone in a specific city could fall back to a more general message like
Your Exclusive Offer.
The bottom line is that every single recipient sees a complete, polished image, no matter what. This prevents any broken or awkward results, protecting your brand's integrity and guaranteeing a great experience for everyone on your list.
Will Personalized Images Hurt My Email Deliverability?
Nope. When you do it right, email image personalization won't harm your deliverability. In fact, it can sometimes give it a boost. These images are just delivered through a standard URL, the same way you’d add any other picture to an email from the web.
The image itself is created on the fly the moment your subscriber opens their email. Because each URL can be unique to that specific person, it signals to inbox providers like Gmail and Outlook that your content is highly individual—not just another generic bulk message. The key is using a reliable service with fast, optimized servers so the images load instantly and don't raise any red flags.
Can I Use This for More Than Just Marketing Emails?
Absolutely. Once you start thinking of this as "merge tags for images," a whole world of possibilities opens up beyond typical marketing campaigns. It's an incredibly flexible tool that can add a human touch to almost any kind of digital communication.
We see sales teams using it for personalized outreach on platforms like LinkedIn to warm up leads. Event organizers send custom digital tickets with attendee names and unique QR codes. Even HR departments can automate personalized onboarding materials for new hires. It's a fantastic way to add a personal element to just about any interaction.
Ready to create those "wow" moments and see your engagement climb? With OKZest, you can easily automate personalized images for your emails, sales outreach, and a whole lot more. Start creating for free today!