You can automate Canva in a few different ways. For simple batch jobs, the built-in Bulk Create feature is your best bet. For ongoing, personalized campaigns, you can connect Canva to no-code platforms. And for deep, custom integrations, there’s always the API.
Each path saves a ton of time, turning what was once a manual design chore into a scalable content machine.
Why Canva Automation Is a Marketing Game Changer
Picture this: you need 500 unique social media graphics for an upcoming virtual summit. Each one has to be personalized with an attendee's name and their specific agenda. Doing that by hand is a logistical nightmare—it’s tedious, full of potential errors, and a massive time suck.
This is exactly where knowing how to automate Canva becomes a necessity for any modern marketing team.
Making the jump from manual design to automated workflows is a huge shift. It lets you achieve personalization at a scale that's no longer just a nice-to-have. Generic, one-size-fits-all visuals simply get lost in the noise. Automation changes the game, turning a mass email or social campaign into something that feels like a one-on-one conversation.
Understanding the Three Paths to Automation
The sheer scale of Canva’s user base makes the need for smarter workflows pretty obvious. The platform exploded to over 240 million monthly active users in Q1 2025, an incredible 8x jump since 2020. With 95% of Fortune 500 companies now using it, you can only imagine the hours wasted on repetitive design tasks. Tasks that, if automated, could boost engagement by up to 20%. You can dig into more data on Canva's growth and how it’s changing marketing.
There are three main ways to get that time back, each suited to different needs and technical skills:
- Native Tools: Canva’s built-in "Bulk Create" is perfect for straightforward, one-off projects. Think personalized certificates or event name badges pulled from a simple spreadsheet.
- No-Code Platforms: Tools like OKZest connect your Canva designs to data sources (like Google Sheets) for continuous, automated image generation without touching a line of code. This is perfect for ongoing campaigns, like personalized welcome emails.
- API Integration: For the developers out there, an API offers total control. You can programmatically generate visuals on the fly, plugging dynamic content straight into your apps, websites, or complex marketing funnels.
The goal isn't just to make more images faster; it's to create more meaningful and relevant experiences for your audience. Automation is the bridge between your data and your design, enabling you to build stronger customer relationships at a scale that was previously impossible.
To help you decide which path is right for you, we’ve put together a quick comparison table and a flowchart.
Canva Automation Methods at a Glance
This table breaks down the three approaches to automating Canva, helping you quickly see which one fits your project and skill set.
| Method | Best For | Technical Skill | Scalability |
|---|---|---|---|
| Canva Bulk Create | One-off, simple batch projects like certificates or name tags. | Low: Basic spreadsheet knowledge is all you need. | Low: Good for dozens or hundreds, but not continuous generation. |
| No-Code Platforms | Ongoing, automated campaigns like personalized emails or social media DMs. | Low to Medium: Requires setting up integrations and mapping data. | Medium to High: Scales well for recurring, data-driven tasks. |
| API Integration | Deep, custom integrations into apps, websites, or complex workflows. | High: Requires programming knowledge (e.g., Python, Node.js). | High: Fully scalable and customizable for any volume or complexity. |
Each method has its place. Your choice really depends on whether you're doing a one-time batch job, need a continuous "always-on" workflow, or require a deeply integrated, custom solution.
This decision tree also helps visualize which automation path makes the most sense based on your comfort with technology and project scope.
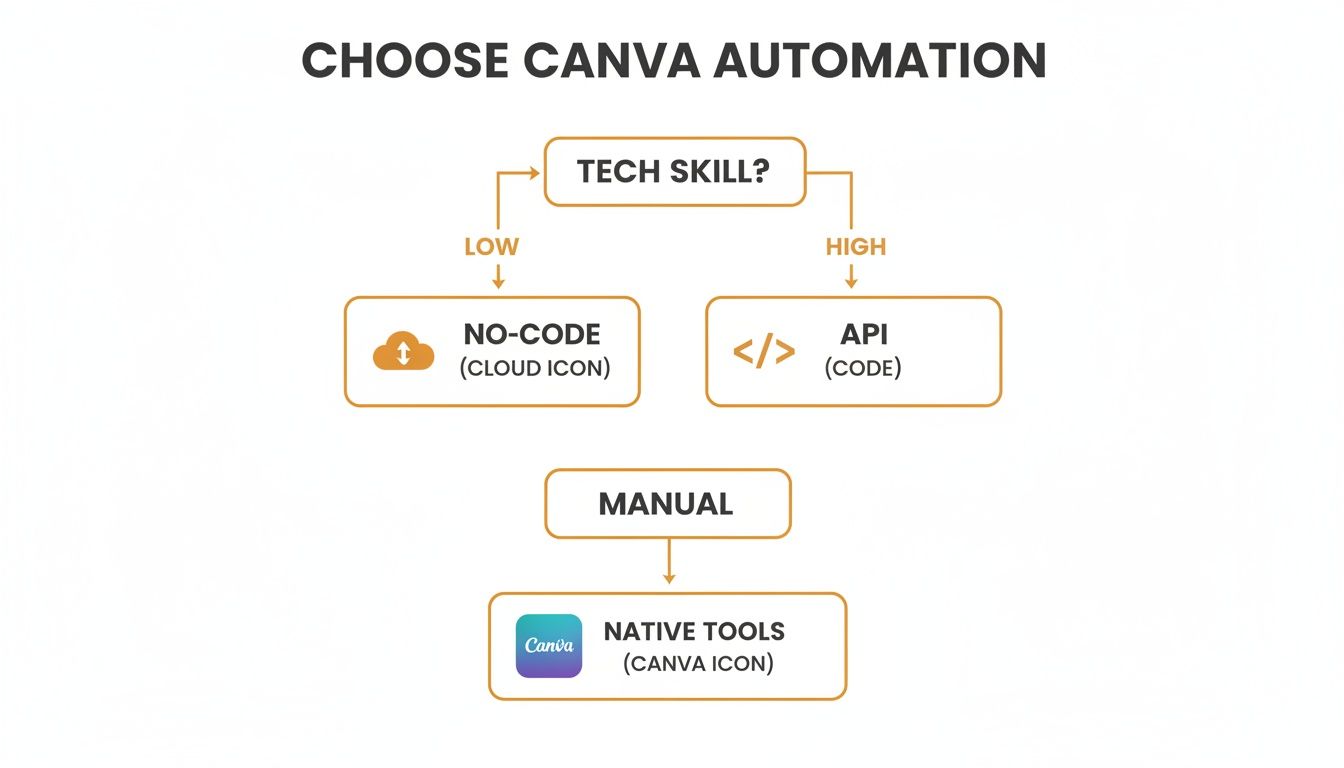
As the flowchart shows, your technical comfort level is the biggest factor in choosing between a straightforward no-code solution and a more hands-on API integration.
Getting Started with Canva's Native Bulk Create Feature
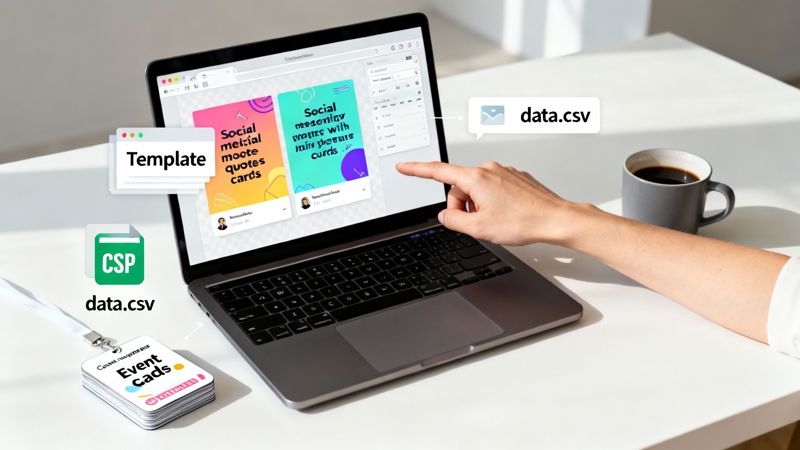
Before you jump into third-party tools and complex workflows, it's always smart to master what Canva offers right out of the box. The Bulk Create feature is a surprisingly powerful, native solution for churning out designs from a single template and a set of data. It's the perfect way to automate Canva for one-off projects.
Think of it like a mail merge, but for your visuals. You design one master template—maybe an event badge, a certificate of completion, or a whole series of social media quote cards. Then, you feed it a data file to automatically generate dozens, or even hundreds, of unique variations. This is your go-to method for when you have all your data upfront and just need to produce a large batch of graphics quickly.
Preparing Your Design Template
The real secret to making bulk creation work smoothly is a flexible template. Your design has to be able to handle data of different lengths without completely falling apart. For instance, a short name like "Ian" and a much longer one like "Christopher" should both fit gracefully into the name field you've set up.
To pull this off, build in some extra buffer space around your dynamic elements. I’ve found that using text alignment tools (like center or right-align) gives you more control over how the text expands. It’s also a good idea to pick fonts and font sizes that stay clear and readable, even when a text box is nearly full.
Here are a few design tips that have saved me a ton of headaches:
- Use Placeholder Text: Actually type placeholder text like
{{First Name}}or{{Job Title}}right where you plan to insert your data. This makes it visually obvious which parts of the design will be automated. - Lock Static Elements: If you have logos, background images, or border designs that should never change, lock them in place. This simple step prevents you from accidentally moving them around later.
- Group Related Items: Got a few elements that need to stay together, like a person's name and their title? Group them. This keeps their spacing and alignment consistent when Canva generates all the new designs.
Structuring and Connecting Your Data
The engine driving the Bulk Create feature is usually a simple CSV file, though you can also enter your data manually. Each column in your spreadsheet corresponds to a dynamic element in your Canva template, and each row represents a brand-new design to be generated.
It might look something like this:
| First_Name | Last_Name | Job_Title |
|---|---|---|
| Sarah | Chen | Marketing Director |
| David | Rodriguez | Lead Developer |
| Emily | Jones | Product Manager |
Once your CSV file is ready, you'll upload it and start mapping the data. Inside Canva, you just right-click on a design element (like your {{First Name}} placeholder text) and select "Connect data." From there, you pick the corresponding column from the file you uploaded, such as First_Name. You'll repeat this quick process for all the dynamic fields in your design.
Pro Tip: Keep your column headers simple and descriptive, with no spaces or special characters. Something like
FirstNameis better thanFirst Name!. This helps ensure Canva can read and map your data fields without any errors, saving you a lot of troubleshooting later on.
Scaling with No-Code Tools Like OKZest
Canva's Bulk Create feature is fantastic for knocking out a big batch of images in one go, but what happens when you need automation that's always running in the background? This is where no-code platforms step in. They act as a bridge, connecting your Canva designs to live data sources to put your visual content creation on complete autopilot—no coding required.
Imagine sending a personalized welcome image the instant someone joins your newsletter. Or what about automatically firing off a custom "thank you" graphic via DM to a new social media follower? These are the kinds of ongoing tasks that Bulk Create can't handle, but they're the sweet spot for a no-code solution.
Connecting Canva to Your Data
First things first, you’ll need to connect your Canva account to a no-code tool. This is usually a simple one-time authorization, giving the platform permission to access your designs and generate new images from them. Once that's done, you're ready to build your workflow.
This is where a specialized service like OKZest really shines. You can explore the platform and see how it’s built from the ground up to automate Canva image generation for marketers and agencies. The whole idea is to link a Canva template to a data source, whether that’s a Google Sheet, an Airtable base, or even a webhook from your CRM.
Defining Dynamic Content with Merge Tags
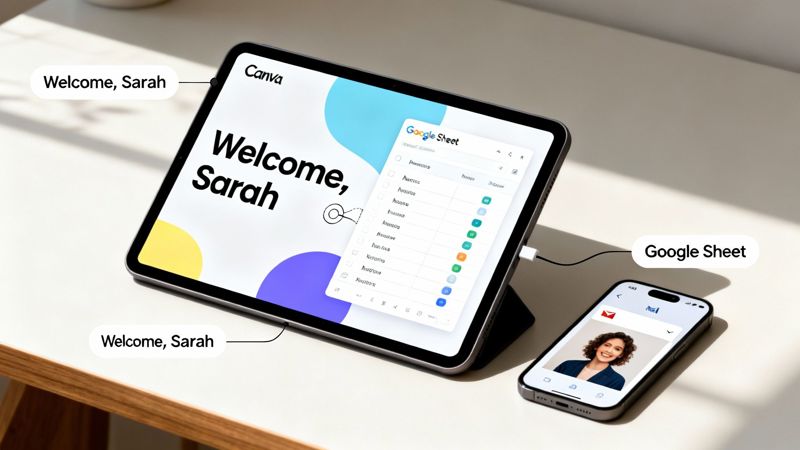
Just like with Bulk Create, the real work happens inside your template. But instead of mapping spreadsheet columns, you'll use special placeholders called merge tags inside the no-code tool. These tags are what tell the system which parts of your Canva design need to be dynamic.
For instance, your Canva template might have a text box that says, "Welcome to the community!" You can map this to a merge tag like {{first_name}}. When the automation runs, it grabs the actual first name from your data source—like a new row in a Google Sheet—and injects it right into the image.
OKZest is perfect for this, offering a simple way to generate personalized images at scale, like custom certificates or newsletters. It uses merge tags that pull data from APIs or databases and is compatible with 99% of ESPs like Klaviyo and Mailchimp.
Setting Up Fallback Values for Flawless Results
But what happens when your data isn't perfect? Let's say a new subscriber signs up without giving their first name. If you haven't planned for that, your automation could spit out an image with an awkward blank space, which just looks unprofessional.
This is exactly why setting up fallback values is so important. A good no-code tool lets you define a default for any merge tag that comes up empty.
- If
{{first_name}}is missing, you could set the fallback to "Friend." - If a
{{company_logo}}URL doesn't work, you can default to a generic icon.
This simple safety net ensures every image your system generates looks complete and polished, protecting your brand's quality regardless of the input data.
An automation workflow is only as strong as its weakest link. Fallback values are your insurance policy against messy data, ensuring a consistent and high-quality experience for every single person.
The final output from a tool like OKZest isn't a folder full of JPEGs. Instead, it generates a unique image URL for each personalized graphic. This URL is incredibly powerful—you can embed it directly into an email marketing platform (like Instantly or Klaviyo) or even use it in a website's <img> tag. When a user opens their email, the URL loads their unique, personalized image on the fly, creating a truly one-of-a-kind visual experience.
Unlocking Full Control with API Automation

While no-code tools are fantastic for marketers, sometimes you just need to get under the hood for a deeper, more custom integration. For developers, agencies, or any business with an existing app, an image generation API offers the ultimate control for automating Canva. This is where you can programmatically create and tweak visuals on the fly, straight from your own code.
Think of it like having a direct line to a design engine. Instead of clicking around in a user interface, you make API calls that feed data—like text, image URLs, or color codes—into a master Canva template. The API then fires back a fully personalized image, ready to plug into your app, website, or a complex marketing funnel.
The API Workflow From Template to Generation
It all starts, as usual, inside Canva. You’ll design a master template that contains all your static brand elements and defines the dynamic layers that the API will update. Every element you want to change, whether it's a text box for a name or a shape for a profile picture, gets a unique identifier or "layer name."
With the template set, the rest of the magic happens in your code. Your application will make an API call, sending a payload of data that tells the system exactly which layers to modify and what content to drop in.
A standard API call would typically include things like:
- Template ID: The unique identifier for your master Canva design.
- Modifications: A list of changes, specifying the layer name and the new content (e.g.,
text: "Jane Doe"orimageUrl: "https://example.com/jane.jpg"). - Format: The output format you need, like PNG or JPG.
For a more technical deep dive, our guide on the Canva API walks you through setting up these powerful integrations from scratch.
Powerful Use Case: Personalized Course Certificates
Picture this: you run an online course platform. The second a student passes their final exam, your system triggers an API call. That call zips the student's name, the course title, and the completion date over to your certificate template.
Within seconds, a beautifully branded, personalized certificate is generated. The API returns the image URL, which is then automatically emailed to the student or added to their user profile. The entire workflow is hands-off, scalable, and creates an instant, rewarding moment for your users. It’s a perfect example of automating Canva for a seriously high-impact result.
An API-driven approach moves beyond simple batch processing. It enables real-time, event-triggered image generation that can be woven directly into the fabric of your product or service, creating seamless and dynamic visual experiences.
This method is built for scale. For sales and social media teams targeting major markets like the U.S., Brazil, and India—Canva's top regions—OKZest slashes creation time, enabling millions of images monthly across tiers from free to enterprise. With Canva hitting $3.3 billion in revenue and a $42 billion valuation in 2025, automating via OKZest isn't just smart—it's essential for staying ahead.
Practical Use Cases and Real-World Examples
It’s one thing to talk about automation in theory, but seeing it in action is where the real lightbulb moments happen. Let's walk through a few real-world scenarios where automating Canva creation solves genuine business problems and creates some seriously impressive results.
These examples show how you can connect a dynamic data source to a well-designed Canva template to turn repetitive, manual design work into a powerful, automated marketing engine.
Personalized Outreach at Scale
Imagine you have a B2B sales team gearing up for a big outreach campaign. Instead of sending out the same generic pitch deck to everyone, they can automate the cover slides. By connecting their CRM or even just a spreadsheet, each slide can be instantly populated with the prospect’s name, company, and logo. It’s a small touch, but it makes a huge first impression.
Event organizers can use the same principle to generate unique social media graphics for every person who registers. Picture a personalized graphic with the attendee's name, their specific agenda highlights, or even a unique QR code for check-in. It completely elevates the event experience from the very first touchpoint.
Personalized images let you speak to people like individuals, hold their attention, and build much stronger relationships—which, of course, helps the bottom line. This works wonders across email, social DMs, websites, and even chatbots.
Dynamic E-commerce and Real Estate Visuals
For e-commerce stores, tackling cart abandonment can get a lot more visual. An automation workflow can generate an image featuring the exact products a shopper left behind and plug it right into a follow-up email. Seeing the items they were just considering is a powerful nudge that often brings them back to complete the purchase.
Real estate agents can also get a massive time-saver by automating "Just Listed" or "Recently Sold" graphics.
- The Challenge: Manually creating a unique social media post for every single new listing is a huge time suck and opens the door for typos and errors.
- The Automation: An agent links their Canva template to their MLS database using a no-code tool like OKZest.
- The Result: The moment a new property goes live, a polished graphic—complete with the main photo, price, and address—is automatically created and ready to share.
This same logic is a game-changer for email campaigns, where dynamic visuals can really make your click-through rates jump. We have a whole guide dedicated to using personalized images for email marketing if you want to dive deeper into those techniques. These automation methods are also key for more advanced projects, like streamlining the process of creating AI influencers by auto-generating a steady stream of consistent visual content for their profiles.
Common Questions About Canva Automation
As you start digging into automating Canva, you'll find a few questions pop up almost immediately. Getting these sorted out early on is a huge help—it steers you toward the right tools and helps you sidestep common roadblocks later.
Let's walk through the most frequent questions we hear from marketers and developers who are just getting started with automated visuals.
Can I Automate Images with a Free Canva Account?
Yes, but only to a certain extent. Canva's built-in Bulk Create feature is actually available on their free plan. It’s perfect for simple, one-off batch jobs, like generating a hundred name tags for an event from a single spreadsheet. It’s a great way to dip your toes in.
But for anything more advanced or continuous, you’ll need to bump up to a Canva Pro account. Things like connecting to a live data source with a no-code tool or tapping into an API require the integrations unlocked by the Pro plan. Honestly, the time savings and deep personalization you get easily make the investment worth it.
What if Personalization Data Is Missing?
Ah, the classic "what if" scenario. A smart automation strategy always has a plan for this: fallback values. You never want your final images to have awkward blank spaces just because your data source has a few gaps.
A robust automation setup anticipates imperfect data. Fallback values ensure every generated image looks professional and complete, protecting your brand's quality no matter what the input looks like.
For instance, when you're using a platform like OKZest, you can set a default for any dynamic field. If you’re personalizing an image with {{first_name}} but a specific contact is missing that data, the system can automatically sub in a fallback like "Friend" or "Welcome" instead. No more awkward blanks.
How Do I Add Automated Images into My Emails or Website?
This part is surprisingly straightforward. Automation tools don't just spit out a bunch of files for you to download. Instead, they generate a unique URL for each personalized image, and that URL is the magic key to embedding your visuals anywhere you want.
- For Emails: Inside your email tool (like Klaviyo or Mailchimp), you just pop this URL into an image block. By using merge tags directly within the URL, it becomes completely dynamic and unique for every single person on your list.
- For Websites: On a webpage, you'll use a standard HTML
<img>tag. Thesrcattribute is simply set to the dynamic image URL. You can even pass parameters through the URL to pull in real-time data for some seriously cool, on-the-fly personalization.
Ready to stop designing one by one and start personalizing at scale? OKZest provides the no-code and API tools you need to automate your Canva visuals effortlessly. Create your first automated campaign for free today!