Turning a static picture into a clickable link isn't just a bit of code—it's about creating an interactive gateway for your audience. With one simple click, this technique transforms passive viewers into active participants, making it a cornerstone of effective digital communication.
Why Clickable Images Are So Effective

Before we jump into the HTML, let's talk about why this works so well. A clickable image is a powerful and intuitive call-to-action that easily cuts through the noise of text-heavy emails and web pages.
Put yourself in the user's shoes. You see a great product photo in an email, and your first impulse is to tap it to find out more. That action is far more natural than hunting around for a tiny text link. The same holds true for a blog post; an interesting infographic that links to a detailed report just begs to be explored.
The Power of a Visual Call-to-Action
Making an image clickable taps into some key psychological and practical advantages that give user interaction a serious boost.
- It’s Easy on the Brain: The brain processes images much faster than text. A clickable image instantly shows its purpose, making it easier for users to decide to act without overthinking it.
- Higher Click-Through Rates: Visuals are magnets for the eyes. When you make them interactive, you create a much larger and more appealing target for clicks. We've seen this time and again as a proven way to improve your click-through rate.
- A Better User Experience: Interactive elements make a website or email feel more dynamic. They guide people smoothly from one piece of content to the next, creating a journey that just flows better.
This trend toward visual interaction is backed by serious growth in the digital content creation market. Valued at USD 27.1 billion in 2023, the market is projected to skyrocket to USD 90.4 billion by 2033.
The principle here is straightforward: an image grabs attention, and a link gives it direction. When you combine the two, you create a direct path from interest to action.
If you really want to harness the power of images, it's worth exploring strategies for creating viral content that can maximize your reach. You can also see how this all ties into your key metrics by reading our guide on https://okzest.com/blog/how-to-increase-click-through-rate.
Building Your First Clickable Image with HTML
So, you want to make an image on your website or in an email clickable. Good news—it's surprisingly simple. You don't need to be a coding wizard to pull this off. At its core, creating a clickable image just involves wrapping one piece of HTML inside another. Think of it as putting a picture inside a special envelope that tells the browser exactly where to go when someone clicks it.

The two essential building blocks are the <a> (anchor) tag and the <img> (image) tag. The <a> tag is what creates the link—the destination. The <img> tag, as you might guess, is what puts the actual picture on the page.
When you nest the <img> tag inside the <a> tag, the image itself becomes the link. It's that straightforward. The basic structure looks like this: <a href="DESTINATION_URL"><img src="IMAGE_URL" alt="A description of the image"></a>. This single line of code is the foundation of every clickable image you've ever seen online.
Decoding the HTML Attributes
To get that code working, you just need to fill in a few key "attributes," which are basically instructions for the browser. Let’s break them down.
Here’s a quick reference table to keep the essential attributes straight.
Essential HTML Attributes for Image Links
| Attribute | Tag | Purpose | Example |
|---|---|---|---|
href |
<a> |
The most critical part. It specifies the destination URL where the user is sent after clicking. | href="https://okzest.com" |
src |
<img> |
Stands for "source." This is the URL of the image file you want to display on the page. | src="https://cdn.com/image.png" |
alt |
<img> |
The "alternative text." It describes the image for screen readers and search engines. Crucial for accessibility and SEO. | alt="OKZest logo with a green checkmark" |
target |
<a> |
(Optional) Tells the browser where to open the link. Using _blank opens it in a new tab. |
target="_blank" |
These attributes provide all the information a browser needs to display your image and make it link to the right place.
A simple way to remember this: the
hrefis the address on the envelope, thesrcis the photo you put inside, and thealttext is a note on the back explaining what the photo shows.
A Practical Example
Let's put this into a real-world scenario. Imagine you have a hot new product, and you want an image of it to link directly to the sales page. And, to keep visitors on your site, you want that link to open in a new browser tab.
Your code would look something like this:
<a href="https://yourstore.com/products/spring-sneakers" target="_blank">
  <img src="https://yourcdn.com/images/sneakers.jpg" alt="A pair of bright red spring sneakers on a white background.">
</a>
See that little addition, target="_blank"? That's the secret sauce for opening the link in a new tab. It's a tiny detail, but it makes a huge difference for user experience, as it prevents people from losing their place on your original page. It's a small touch that shows you're thinking about your user's journey.
Creating Dynamic Image Links in Email Campaigns
Static links are fine, but let's be honest—they treat every subscriber exactly the same. If you really want to connect with your audience, you need to create a one-to-one experience. This is where dynamic image links completely change the game, turning a generic broadcast into a personal conversation, at scale.
Imagine sending a promotional image to each subscriber that not only features their name but also clicks through to a unique landing page with a coupon code already filled out just for them. This isn't marketing fantasy; it's what you can achieve by creating an image link with a dynamic URL powered by merge tags from your email service provider.
How Merge Tags Make It Happen
Most email platforms, from Klaviyo to Mailchimp, rely on merge tags (like {{customer.first_name}}) to pull subscriber data directly into an email. You can use that exact same logic for the href attribute in your link's HTML.
Instead of a boring, fixed URL, you build a link that includes a dynamic placeholder. This placeholder gets swapped with a unique value for each person right as the email is sent.
A classic use case is to generate unique links for each contact and store them in a custom field. Your HTML would look something like this:
<a href="{{customer.personalized_link}}">
  <img src="https://okzest.com/image-with-name.png" alt="Your personalized offer is here!">
</a>
When the email goes out, {{customer.personalized_link}} is replaced with the specific URL for that subscriber, sending them straight to their own custom page. You can even take this a step further by learning how to generate personalized images for email campaigns to match the dynamic link.
Crucial Tip: Always, always test your dynamic links with a small segment before a full send. One broken merge tag can lead to thousands of dead links, which kills trust and wastes a great opportunity. Send a test to yourself and a few colleagues to make sure the links resolve correctly.
The push for this kind of personalized visual content is absolutely exploding. The AI-powered image generator market was valued at USD 328.4 million in 2023 and is projected to hit USD 1,880.3 million by 2033. You can read more about the growth of the AI image generator market on GlobeNewswire. This trend isn't just a fad; it shows a fundamental shift toward more engaging and individualized digital experiences.
Automating Image Links with an API
When you need to generate thousands of unique, clickable images on the fly, doing it by hand just isn't going to cut it. This is where you graduate from basic personalization to true automation by using an API to create an image link programmatically. With this approach, your own application can manage the entire process without any manual intervention.
Think about an e-commerce app gearing up for a flash sale. Instead of a designer slaving away to create thousands of unique promotional images, the app simply makes an API call. This call sends key details like the customer's name, their loyalty status, and the last product they looked at.
In an instant, the API generates a completely custom image and sends back a URL. Your app then wraps this URL in an anchor tag, creating a personalized, clickable image that's ready to be dropped into an email or a web notification.
The Power of Programmatic Creation
The upside of this workflow is massive. It gives you incredible scalability, keeps your branding consistent across countless variations, and lets you generate content in real-time based on what your users are actually doing.
Here’s a quick look at how the data flows from your template to the final personalized image that lands in a customer's inbox.
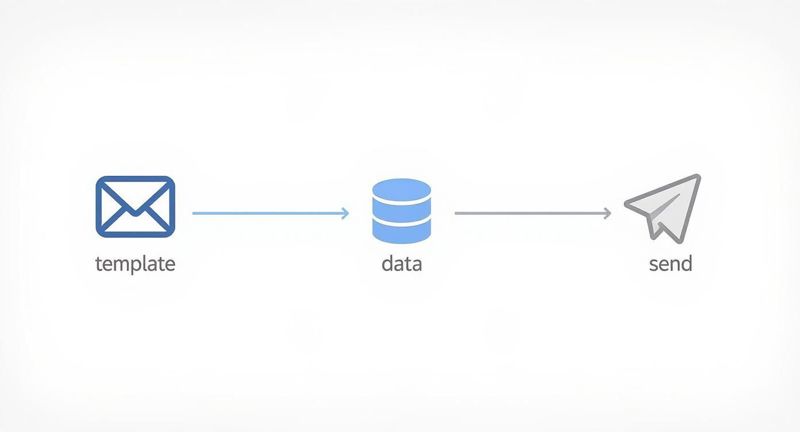
This process really highlights how you can combine a single email template with user data to automatically generate and send unique, clickable images at a huge scale.
A key takeaway here is that API-driven image creation separates the content from the design. Your templates stay the same, but the data—like names, dates, or product details—is swapped out dynamically for each user. This ensures every image is relevant without requiring any manual work.
This kind of automation is getting a huge boost from growth in related technologies. For instance, the global image recognition market was valued at USD 50.36 billion in 2024 and is expected to rocket to USD 163.75 billion by 2032.
If you're looking to scale up your marketing, understanding the principles of email marketing automation is a great place to start. And for the more technical side of things, our guide is ready to help; check out our https://okzest.com/blog/api-integration-tutorial for the practical steps.
Best Practices for Effective Image Links
Just making an image clickable is the easy part. Turning that functional link into a high-performing one that actually gets clicks? That’s where a bit of strategy comes in.
Following a few simple best practices when you’re building an image link makes a world of difference for your users. And a better user experience translates directly into better results for you.
First up, prioritize speed. A stunning image is totally useless if it takes ages to load, especially on mobile. Before you even think about uploading, compress your images. You want to shrink the file size without a noticeable drop in quality.
Tools like TinyPNG or Squoosh are fantastic for this—they can often cut file sizes by over 70%. That’s a massive win for your page load times.
Make Your Links Obvious and Accessible
Next, put yourself in your user's shoes. A clickable image needs to look and feel interactive. Don't make people guess.
- Add Visual Cues: You can signal clickability with simple design tricks. Try adding a button-style frame around the image or a subtle hover effect that changes its appearance when a cursor passes over it.
- Write Descriptive Alt Text: This is non-negotiable. It's crucial for both SEO and accessibility. Instead of a lazy
alt="product", get specific:alt="a pair of red running shoes linking to the spring collection". This tells screen readers and search engines exactly what the image is about and where the link goes. - Enlarge the Clickable Area: On mobile, tiny touch targets are just plain frustrating. Make sure your entire image is easily tappable, giving users a generous clickable area that prevents them from accidentally tapping something else.
The goal is to guide the user seamlessly. An effective image link should be fast, intuitive, and accessible to everyone. Skipping these details leads to missed clicks and a clunky user experience.
Finally, you need to choose the right image format for the job. Each one has its own strengths, and picking the right one is all about balancing quality and performance.
Image Format Comparison for Web Links
Choosing the right format is a key part of optimizing your images. This table breaks down the most common options to help you decide which one best fits your needs, whether you're prioritizing photo quality, transparency, or the smallest possible file size.
| Format | Best For | Supports Transparency | File Size |
|---|---|---|---|
| JPEG | Photographs and complex images with many colors. | No | Smallest |
| PNG | Graphics with sharp lines, text, or logos, especially when you need a transparent background. | Yes | Larger |
| WebP | A modern format that offers superior compression for all image types, often smaller than both JPEG and PNG. | Yes | Smallest |
| GIF | Simple animations and graphics with limited colors. | Yes | Varies |
Ultimately, JPEG is your go-to for photos, while PNG is perfect for logos and graphics needing transparency. If you can, use a modern format like WebP to get the best of both worlds: high quality and small file sizes.
Common Questions About Making Images Clickable
Once you start embedding clickable images, a few questions always seem to come up. Maybe you're wrestling with a weird styling issue or just trying to figure out if anyone is actually clicking on your beautiful hero image.
Let's walk through some of the most common questions we get. Think of this as your quick-start guide to sidestepping those little hurdles.
Can I Make an Image Clickable Without That Ugly Border?
Yes, and you absolutely should. Some older email clients and web browsers have this annoying habit of automatically slapping a blue border around any image that's also a link. It can totally ruin a clean, professional design.
The fix is a simple bit of inline CSS right on your <img> tag: style="border:0;". This tells the browser or email client to keep its hands off. For a more catch-all solution, you can add a img { border: none; } to your main stylesheet. While most modern browsers have moved past this, it's still a crucial little detail for making sure your emails and web pages look sharp everywhere.
How Do I Actually Track Clicks on an Image Link?
This is the big one. If you can't measure it, you can't improve it. The best way to track engagement is by using UTM parameters in your destination URL.
By tacking on tags like ?utm_source=newsletter&utm_medium=hero_image to the end of your link, you're feeding incredibly valuable data to your analytics tool. This lets you see exactly how many people are clicking your images and which visuals are really driving traffic and sales. Most email marketing platforms and tools like Google Analytics are built to read these tags automatically.
What’s the Best Image Size for Email?
When it comes to email, you're always walking a fine line between image quality and file size. An image that takes too long to load is an invitation for your subscribers to hit the delete button before they even see it.
A good rule of thumb is to keep your image width at or below 600-650 pixels. This size fits comfortably within the standard viewing pane of most major email clients. Just as important: always compress your images before uploading them. This shrinks the file size without a noticeable drop in quality, ensuring a speedy load time.
Accessibility isn't just a nice-to-have; it's essential. The single most important thing you can do is add descriptive
alttext to your<img>tag. Screen readers use this text to describe the image to visually impaired users, so they understand both the visual content and where the link goes. For example, usealt="Red running shoes linking to our new spring collection"instead of something generic likealt="product image".
Ready to create stunning, personalized images that drive clicks and conversions? With OKZest, you can automate the entire process, from generating unique visuals with merge tags to integrating them seamlessly into your email and web campaigns. Start for free on okzest.com and see the difference personalization can make.