When you hyperlink a photo, you're really just wrapping an image inside a link. It’s a simple trick, but it transforms a static picture into an interactive gateway, sending users exactly where you want them to go. If you're in marketing, sales, or content, this is a must-have skill in your toolkit.
Why Clickable Photos Are a Marketing Powerhouse
Before we get into the "how-to," let's talk about why this is so important. A hyperlinked image is more than just a picture; it's a powerful call-to-action (CTA) that blends visual appeal with clear intent. Our brains process images 60,000 times faster than text, so a great photo is the quickest way to grab attention and spark action.
When someone sees an image that catches their eye, their first instinct is often to interact with it. By making it clickable, you're removing all the friction between interest and conversion. You're creating a seamless path forward.
Boosting Engagement and Driving Traffic
Think about a typical e-commerce scenario. A clothing brand posts a fantastic photo of a new jacket. If there's no link, a potential customer has to leave the post, go search for the website, hunt down the product, and then maybe buy it. That's a lot of work.
But a hyperlinked photo? That takes them straight to the product page with a single click.
This direct connection is a total game-changer for a few reasons:
- It cuts down on user effort, which dramatically increases the odds they'll follow through.
- It creates a more intuitive user experience, making your site or email feel polished and professional.
- It drives super-targeted traffic because the person clicking is already visually sold on what you're offering.
A well-placed, clickable image acts as a silent salesperson. It presents the product, piques interest, and provides an immediate path to purchase without a single word of text.
The Power of Visual Calls to Action
The data backs this up, big time. In the fast-paced world of digital marketing, embedding links in images sends engagement through the roof. For example, social media posts with images get 2.3 times more interaction than text-only updates.
On top of that, social commerce is projected to hit $1.3 trillion by 2026, with hyperlinked photos driving a massive 55% of video-inspired purchases. You can dig deeper into these trends with recent photo-sharing market analysis.
This isn't just a social media thing, either. A webinar host can link a banner in an email to get more sign-ups. A real estate agent can link property photos to virtual tours. In every single case, you hyperlink a photo to turn passive viewing into active participation. It’s a small technical step with a massive strategic payoff.
The Foundation: How to Hyperlink a Photo with HTML
At its core, every single clickable image you see online—whether it’s in an email, a blog post, or a fancy web app—is built on one simple HTML principle. Once you get this down, you’ll understand the universal language that all these platforms use behind the scenes.
You’re basically just telling a web browser to take one thing (an image) and wrap it inside another (a link). Simple as that.
This is all done by combining two of the most fundamental HTML tags: the <a> tag, which stands for "anchor" and creates the link, and the <img> tag, which is what puts the image on the page. When you nest an <img> tag inside an <a> tag, the image itself becomes the clickable part of the link.
Breaking Down the Code
The complete HTML snippet to make a photo clickable looks pretty clean and logical once you see it in action. It’s a structure you’ll start recognizing everywhere once you know what to look for.
Here’s a practical, copy-and-paste example you can use right away:

This screenshot shows the basic attributes of the anchor <a> tag, which is what makes your content clickable.
The href attribute is the most important part here. It specifies the destination URL—the exact web address the user will be sent to when they click.
The Three Essential Components
Let's quickly go over what each piece of that code does. Each one serves a critical purpose for functionality, accessibility, and even SEO.
href="URL": The
href(short for hypertext reference) attribute is the destination. This is where you put the full web address. A common mistake I see all the time is people forgetting thehttps://part, which can easily break the link.src="URL": The
src(source) attribute points directly to your image file. This has to be a direct link to wherever the image is hosted, whether that's on your own server or a third-party service like Amazon S3.alt="description": The
alt(alternative) text is absolutely critical, so don't skip it. It describes the image for screen readers used by visually impaired individuals, and it also tells search engines what the image is about, which is great for your SEO.
A good way to think about it is this: The
<a>tag is the envelope, thehrefis the mailing address written on it, and the<img>tag is the letter you put inside. Thealttext is what you’d tell someone over the phone to describe what’s in the letter.
By mastering this simple combination, you now understand the mechanics behind linking images on just about any digital platform out there. For a more detailed dive, check out our complete guide on how to link an image in HTML. This foundational knowledge will make troubleshooting and more advanced techniques a whole lot easier down the road.
Making Images Clickable in Your Everyday Tools
Alright, you've got the HTML basics down. The good news? You'll rarely have to touch a line of code to make an image clickable. Most of the tools you use every day—from your email client to your blog's backend—have simple, user-friendly interfaces that do all the heavy lifting for you.
At its core, the process is always the same: you select the image, find the "link" icon (it usually looks like a paperclip or a chain link), and paste in the destination URL. That’s it. The software automatically writes the clean HTML for you behind the scenes.
This flowchart breaks down that underlying structure we talked about earlier. It’s a great visual reminder of how the destination URL, the image source, and the alt text all work together.
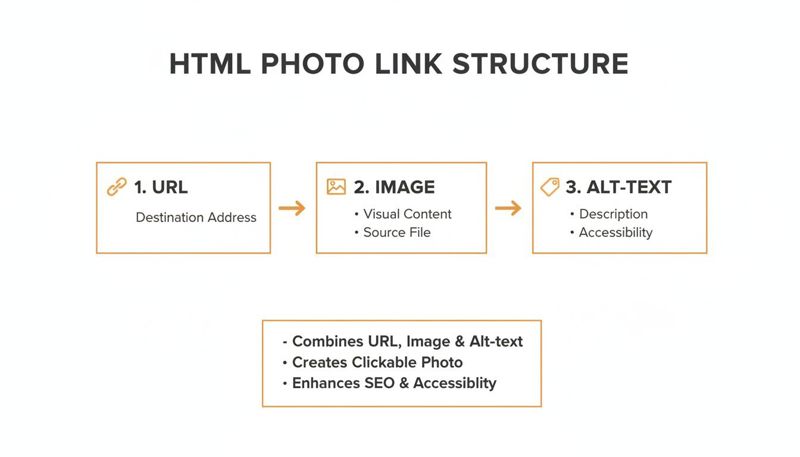
Think of it this way: your clickable photo is just an image (<img> tag) wrapped inside a link (<a> tag). The alt text is there to give context to screen readers and search engines, making the whole thing accessible and SEO-friendly.
Platform Comparison for Hyperlinking Photos
To give you a quick overview, here’s a look at how different platforms handle image linking. While the goal is the same, the exact steps can vary slightly.
| Platform | Method | Best For | Ease of Use |
|---|---|---|---|
| Raw HTML | Code-based: <a href><img></a> |
Web developers, precise control | Hard |
| Email Clients | Toolbar icon or keyboard shortcut | Email marketing, newsletters | Easy |
| WordPress | Block editor toolbar | Blog posts, website pages | Very Easy |
| MS Office | Right-click context menu | Documents, presentations | Easy |
| ESPs (e.g., Mailchimp) | Drag-and-drop editor | Scaled email campaigns | Very Easy |
As you can see, most modern editors are designed to make this process incredibly straightforward, so you can focus on your content, not the code.
Linking Photos in WordPress
If you’re a blogger or run a website on WordPress, this is something you'll do all the time. The block editor makes it painless.
After you've added an image block to your post or page, just click on the image itself. A small toolbar will pop up directly above it. Look for the paperclip icon, click it, and a field will appear for you to paste your destination URL.
Here’s a tip I always follow: check the box to "Open in new tab". This is a small but crucial detail for user experience. It keeps visitors on your site while still letting them view the linked content, which can help keep your bounce rate down.
How to Hyperlink a Photo in Email Clients
In email marketing, clickable images are your bread and butter—they're often your primary call-to-action. Luckily, the process is pretty much the same whether you're using Gmail or Outlook.
- In Gmail: Pop your image into the email body, then click on it to select it. The quickest way to add a link is with the keyboard shortcut Ctrl+K (or Cmd+K on a Mac). A small window will appear where you can paste your URL.
- In Outlook: The experience is almost identical. Insert your picture, right-click on it, and choose "Link" or "Hyperlink" from the menu. From there, you just need to enter the web address.
Pro Tip: Before you hit send on any marketing email, always send a test to yourself to check the links. A broken link isn't just a missed click; it can make your brand look sloppy and unprofessional.
Making Images Clickable in Microsoft Office
The need to hyperlink a photo isn't just a web thing. It’s incredibly useful in professional documents and presentations for linking out to reports, source materials, or company websites.
In Microsoft Word and PowerPoint, the steps are the same:
- First, insert your image into the document or slide.
- Next, right-click the image to bring up the context menu.
- Select "Link" from the list of options.
- A dialog box will open. Paste your full URL into the "Address" field and click OK.
This simple action can make a static report feel much more interactive. Beyond just linking, you can also explore innovative QR code photo solutions that allow people to scan an image with their phone to get to your content. And if you’re trying to link to an image, you'll first need a direct link for it; we cover exactly how to do that in our guide on how to create a URL for an image.
Taking It to the Next Level: Advanced Personalization with Clickable Images

So, you've mastered making static images clickable. What's next? This is where the real magic happens: creating one-to-one experiences with dynamic, personalized images.
Imagine sending an email where every single person sees a unique photo with their own name, company, or a product they just looked at. And when they click that image, it takes them to a landing page that's also customized just for them.
This isn't some far-off marketing dream. It's something you can do right now using image personalization tools like OKZest inside the email platform you already use. The trick is to wrap a dynamic image merge tag inside a standard HTML link, combining visual punch with a direct, clickable call to action.
Building Your Dynamic Link in Mailchimp, Klaviyo, and More
No matter which ESP you're using, the setup involves a little bit of HTML. Instead of pointing to a static image file, you'll use a dynamic URL from your personalization tool.
The code looks almost the same as a standard linked image, but it's way more powerful:

See what's happening here? The <img> tag is using a merge tag—{{first_name}}—to generate a custom image on the fly. At the same time, the <a> tag is using the {{email}} merge tag to build a unique URL for the landing page. This is how you hyperlink a photo at scale and make every single click count.
Why This Is Such a Game-Changer
This technique fundamentally changes your marketing from a one-way broadcast into a two-way conversation. We've seen email campaigns using hyperlinked personalized photos get massive lifts in engagement.
Think about the possibilities. A real estate agent could send out flyers where the main image of a home links directly to a virtual tour of that specific property. A sales team can create outreach emails where an image has a prospect's company logo and links to a pre-filled demo request form.
The potential is huge, especially on visual platforms. Stories on Instagram and Facebook already get over 1.1 billion daily views, and a single hyperlinked photo can drive 2.3x more engagement than plain text alone. Best of all, these dynamic images are compatible with 99% of ESPs, pulling live data to make sure every interaction is relevant. You can dig into more stats on the growth of visual content sharing to see where things are headed.
Key Takeaway: Personalized, clickable images create a "wow" moment that cuts through the noise. It shows your audience you see them as individuals, not just another entry on a list, which builds trust and drives action.
A Few Pro Tips for Personalized Images
To make sure everything goes off without a hitch, there are a few best practices to keep in mind. Getting these small details right will prevent technical headaches and make your campaigns look far more professional.
- Always have a fallback. What happens if you don't have someone's first name? Your personalization tool should let you set a default, like "Friend" or a generic greeting. Without a fallback, you risk showing a broken image, which is a bad look.
- Keep your URLs clean. Double-check that your merge tags are formatted correctly inside both the image source and the destination link. A single misplaced bracket can break the whole thing for that one person.
- Test, test, and test again. Before you hit send on the full campaign, send tests to a few different email addresses. Use different data variations—long names, short names, and especially contacts where you know some data is missing. This is the only way to catch problems before your audience does.
Getting More From Your Clickable Images: SEO & Accessibility
Making an image clickable is a great start, but it's only half the battle. To really squeeze every bit of value out of your visuals, you need to think about performance, accessibility, and tracking. These aren't just technical afterthoughts; they have a direct impact on how people experience your site and how you measure what’s actually working.
A linked image that isn't optimized can backfire. If the file is too big, it’ll drag your page load speed down—a huge red flag for both users and search engines. In today's world, a fast, smooth experience is simply expected.
Why Alt Text is Non-Negotiable
We’ve touched on this before, but it’s so important it’s worth repeating: descriptive alt text is mandatory. This short line of text serves two incredibly important functions. First, it makes your site accessible to people with visual impairments who use screen readers. The software reads the alt text out loud, telling them what the image is and, crucially, that it's a link to something else.
Second, alt text gives search engines vital context. It explains what your image is about and what the page it links to contains. This effectively turns your image into a piece of SEO-friendly anchor text. If you want your clickable images to help you rank better and reach more people, understanding core SEO strategies is a must.
Track Everything with UTM Parameters
So, how do you know if your beautiful, clickable images are actually doing anything? You track them. By adding UTM parameters to the end of your link, you can tag every single click with specific, useful information.
It’s easy to set these up to track things like:
- Source: Where did the click come from? (
utm_source=newsletter) - Medium: What marketing channel was it? (
utm_medium=email) - Campaign: Which specific promotion is this part of? (
utm_campaign=spring_sale)
This data gets piped straight into tools like Google Analytics, giving you a clear picture of which visual calls-to-action are hitting the mark. You stop guessing and start knowing exactly what drives results. When sharing on social media, properly tagged links also affect how your content is displayed. You can dive deeper into this in our guide on the Open Graph preview.
When you link a photo without UTMs, you're flying blind. You can see traffic arrived, but you have no idea which specific image sent them. Tracking gives you the hard data you need to make smarter decisions with your visual marketing.
Adding a Little Polish to the User Experience
Finally, a couple of simple styling tweaks can make a huge difference in how users interact with your linked images. By default, some older browsers and email clients will slap an ugly blue border around any image that's a link. You can get rid of that in a second with a tiny bit of CSS (border: 0;).
Another fantastic touch is adding a subtle hover effect. This visual feedback—maybe the image gets slightly brighter or a faint shadow appears—tells the user, "Hey, this is interactive!" It’s a small detail, but it makes your design feel more alive and professional, encouraging that all-important click.
Fixing Common Clickable Image Problems
Even a simple task like making a photo clickable can occasionally go sideways. When a linked image isn't behaving, it’s usually down to one of a few common culprits. The good news is, they're typically easy to fix once you know what to look for.
The most frequent issue I see is a broken link. You click the image, and boom—a "404 Not Found" error. More often than not, this is just a simple typo in the destination URL inside your href attribute. Always take a second to double-check your link for any missing letters, extra characters, or an incomplete address. Forgetting the https:// prefix is a classic mistake.
Another common headache is when the image itself doesn't show up at all, leaving you with that dreaded broken image icon. This tells you the problem is with the image's source path in the src attribute.
Diagnosing Path and Link Problems
When an image goes missing, the key is to understand the difference between relative and absolute paths. It's a simple distinction but the source of many frustrations.
- Absolute Path: This is the full URL, like
https://okzest.com/logo.png. It's the most reliable method because it points to a specific, unchanging location on the web. - Relative Path: This is a partial path, something like
/images/logo.png. It tells the browser to find the image file relative to where the current page is located. These are fragile and can easily break if you move a page or reorganize your site's folder structure.
My advice? For most web and email work, just use the full, absolute URL for both the link destination and the image source. It’s the safest bet to avoid any path-related confusion and ensures your assets load correctly, no matter where your content is viewed.
Here's a quick sanity check: paste the image's URL directly into your browser's address bar. If the image loads, the path is good. If not, the link is broken at the source, and that's where you need to start digging.
Getting Rid of Pesky Formatting Quirks
Sometimes, the link and image both work perfectly, but the formatting is just… off. A classic example is that unwanted blue border some email clients and older browsers love to wrap around a linked image. It’s a default visual cue that screams "I was made in 2005."
Luckily, the fix is a simple bit of inline CSS added directly to your <img> tag:
style="border:0;"
This one little addition explicitly tells the browser not to draw a border, keeping your design clean and professional. By mastering these quick fixes, you can make sure every photo you link looks and works exactly the way you want it to.
Got Questions? We've Got Answers
Even with the best guides, there are always a few specific questions that come up. Here are some quick, clear answers to the most common things people ask when learning how to hyperlink a photo.
Can I Hyperlink Just One Part of a Photo?
Yes, you absolutely can, but it’s a bit more advanced. The technique is called an HTML image map. It lets you define specific clickable "hotspots"—like rectangles, circles, or even custom shapes—all on a single image. Each hotspot can then point to a different URL.
This is brilliant for things like interactive diagrams, product photos where multiple items are in one shot, or any kind of clickable map. Just know that it’s not a feature you'll find in most simple editors. You'll have to get your hands dirty and write a little HTML using <map> and <area> tags to define the coordinates for each spot.
How Does a Linked Photo Affect My Website SEO?
When done right, it's actually a good thing for your SEO. That descriptive alt text you add to the image? It basically functions like anchor text for a regular link, giving search engines some valuable clues about the page you're linking to.
Linking out to relevant, high-authority pages can also give your site's credibility a little boost. The only real danger comes from a poor user experience—if your linked image is massive and slows down the page, or if the link is broken, that can frustrate users. And frustrating users is something search engines definitely don't like.
A well-optimized, linked image is a win-win. It helps your SEO by giving clear context to search engines and creates a much better, more interactive experience for your visitors.
Will My Clickable Photo Work in All Email Clients?
For the most part, yes. The good old method of wrapping an <img> tag inside an <a> tag is universally supported by every modern email client out there—think Gmail, Outlook, and Apple Mail. It's one of the foundational building blocks of how the web and email work.
That said, some really old or obscure email clients can be a bit quirky with how they render HTML. It’s always a smart move to test your email campaign with a service like Litmus or Email on Acid before you hit send on a big campaign. That’s the only way to be sure your images and links look perfect for everyone.
What Is the Difference Between Linking and Embedding a Photo?
This one trips people up, but it's pretty straightforward:
- Embedding is what makes the photo show up on the page in the first place.
- Linking is what makes that embedded photo clickable.
You have to do one before you can do the other. The two actions work as a team: the <img> tag embeds the image, and then you wrap the <a> tag around it to turn it into a hyperlink. You can't link a photo that hasn't been embedded.
Ready to create stunning, clickable images that speak to every single customer? With OKZest, you can automate personalized images for your email campaigns, websites, and direct messages in just a few clicks. Start for free and see how dynamic visuals can transform your engagement.