An image API URL isn't what you might think. It’s not just a link to a finished picture; it’s a dynamic set of instructions that creates a personalized image on the fly. This simple but powerful concept allows you to change text, images, and other design elements just by tweaking the URL itself.
Why Dynamic Images Are a Game Changer
Think of a standard image link you'd find anywhere online—it points to a static file, like a JPEG or PNG, that never changes. An image API URL is built differently. It’s a programmable link that talks to a server, telling it to generate a visual based on the parameters you include right in the URL string.
What this means is you can create thousands of unique image variations from a single template, all in real time.
This technology fundamentally shifts how we handle visual content. Instead of manually creating dozens of graphics for a campaign, you can set it up to run automatically. It’s not just about being more efficient; it's about creating far more relevant and engaging experiences for your audience.
The rapid growth in this space shows just how impactful it is. The AI image generation market, largely powered by this API-first approach, is projected to climb from $820 million in 2023 to an estimated $2.7 billion by 2025. It's no surprise that API usage for these services saw a 72% year-over-year increase as more businesses baked this automation into their workflows.
Understanding the Core Concept
At its heart, a dynamic URL is a straightforward but incredibly effective tool. You start with a base template image, then use query parameters—those are the little snippets of text added to the end of the URL—to dictate what the final image looks like.
These parameters can control all sorts of elements:
- Text content: Insert a customer's name, a unique discount code, or a specific city.
- Image layers: Swap out a background, overlay a logo, or drop in a product photo.
- Colors and styles: Change the font color, background shade, or even apply visual effects.
- Data visualization: Generate simple charts or graphs based on real-time data feeds.
The real power here is scalability. A single, well-structured image API URL can serve personalized content to an unlimited number of users, with each person seeing a visual made just for them.
Real-World Applications for a Dynamic Image API URL
We see businesses using this technology in some pretty creative ways to solve real problems, from personalizing marketing outreach to automating internal reports. The flexibility is a major plus. Here are a few examples that show how an image API URL can be put to work.
| Use Case | How It Works | Business Impact |
|---|---|---|
| Personalized Email Banners | An image URL includes a merge tag (e.g., *|FNAME|*) that pulls the subscriber's first name into a welcome banner. |
Increases email engagement and makes new subscribers feel seen from day one. |
| Dynamic Social Media Ads | The URL changes the ad creative based on the viewer's location, the time of day, or a specific promotion. | Higher ad relevance and click-through rates, leading to a better return on ad spend. |
| Automated Event Tickets | Each attendee receives a unique ticket image with their name and a personalized QR code, all generated from one template URL. | Streamlines the ticketing process and provides a professional, personalized experience for attendees. |
| E-commerce Product Mockups | A customer types text into a form, and an image URL instantly generates a mockup of a t-shirt or mug with their custom text. | Boosts conversions by allowing customers to visualize their personalized product before buying. |
From e-commerce to event management, the applications are extensive. For instance, platforms generating dynamic visuals often specialize in certain areas, like providing tailored AI-generated images for websites where delivery speed and visual appeal are critical.
By transforming static content into a dynamic medium, an image API URL helps you connect with your audience on a much more personal and effective level.
Building Your First Dynamic Image URL
Alright, it's time to roll up our sleeves and actually build your first dynamic image API URL. Think of it like a recipe. You have your base ingredient (the URL endpoint), a secret sauce (your API key), and then you add specific seasonings (query parameters) to get the exact image you need.
The structure is a lot simpler than it looks once you break it down. Every URL you create will follow the same core logic, which we'll assemble piece by piece.
Understanding the Anatomy of the URL
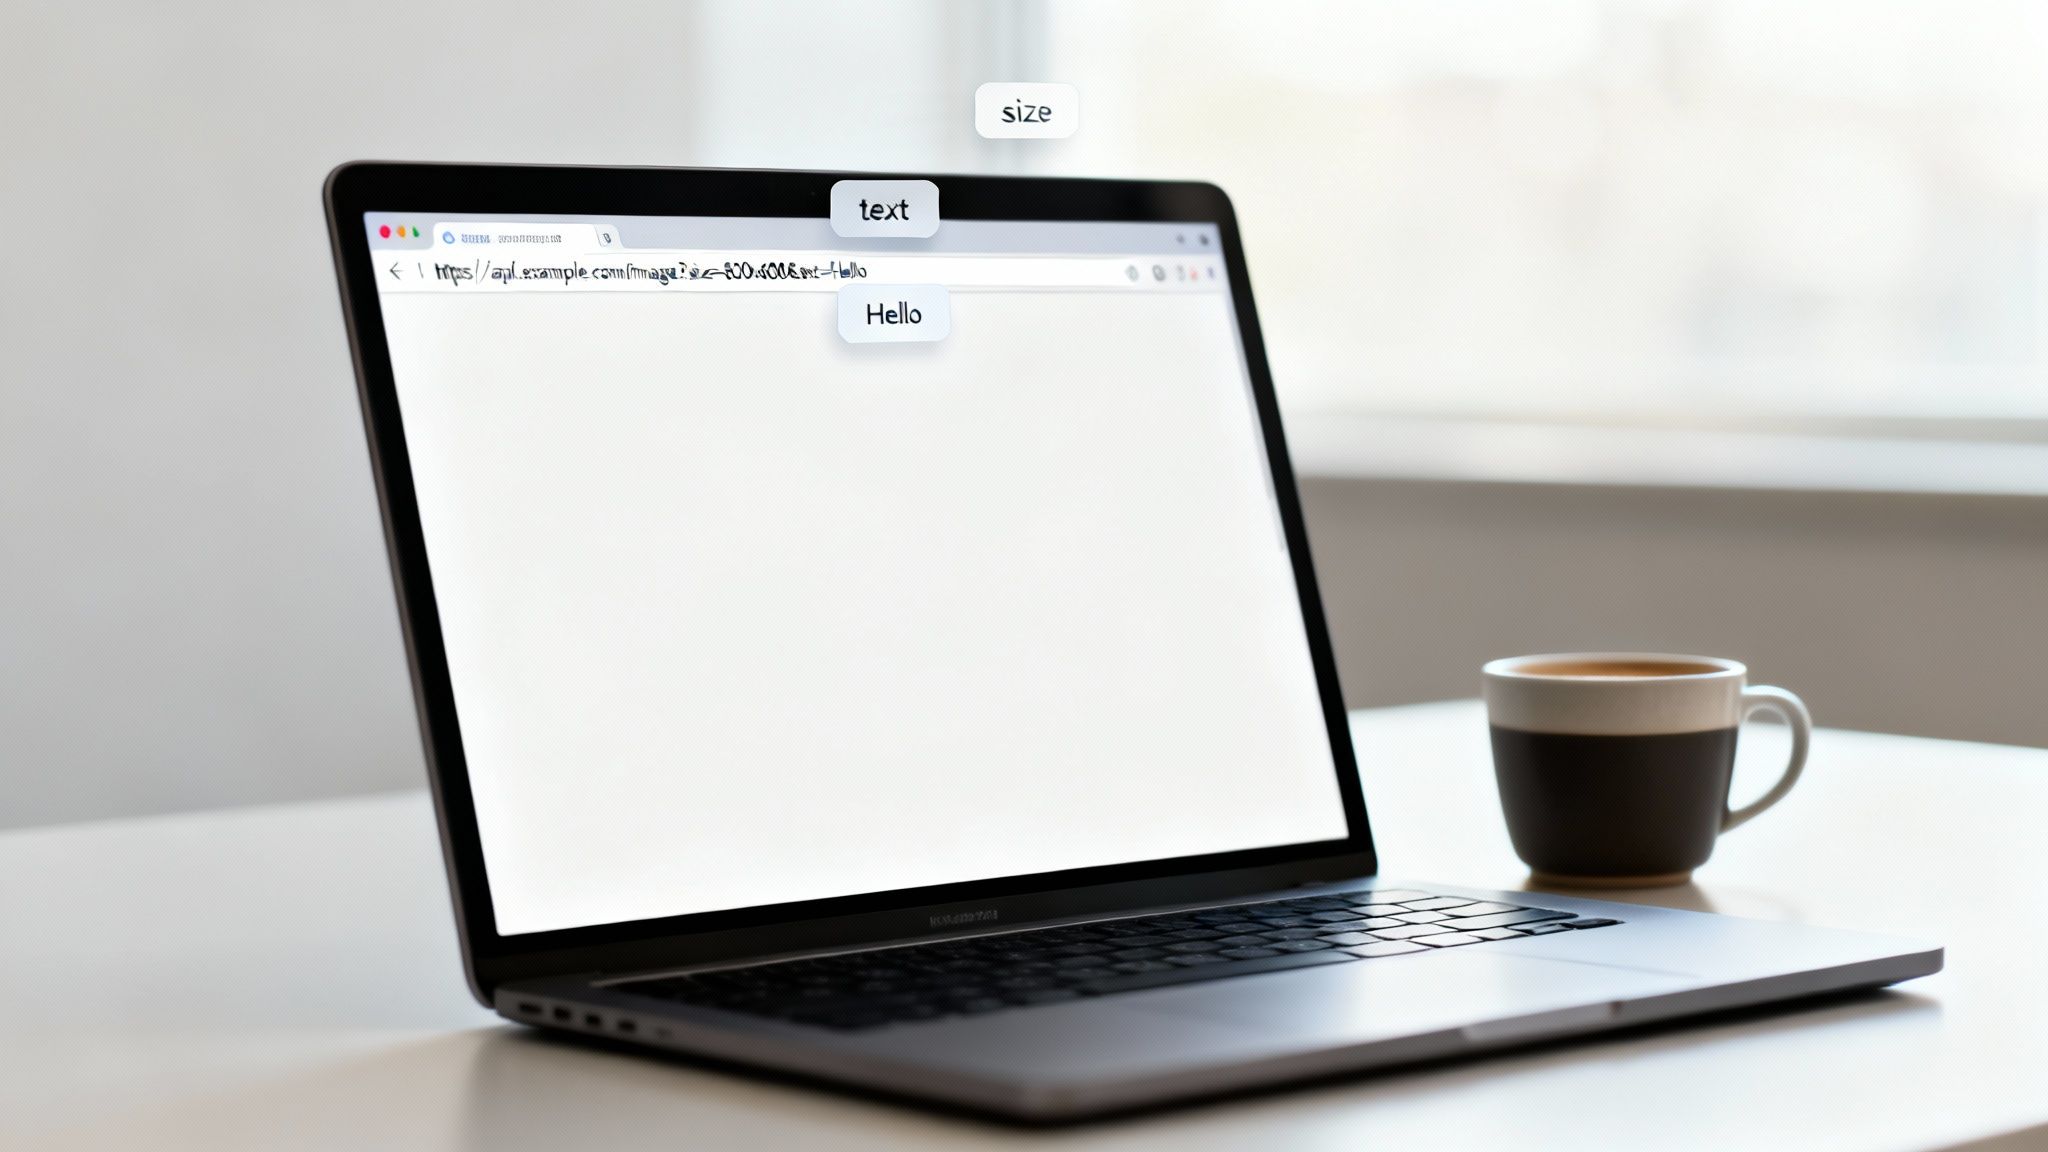
Let's dissect a typical URL to see how the magic happens. On the surface, it's just a web address, but the real power is in everything that comes after the .com.
A complete, functional URL is made of three key parts:
- The Base Endpoint: This is the static part of the URL from your image API service. It points to the server that's going to do all the heavy lifting.
- Authentication: This is usually your unique API key, added as a parameter. It tells the service who you are and makes sure no one else can generate images on your account.
- Query Parameters: This is where you get creative. These are key-value pairs tacked onto the end of the URL that tell the API exactly what to create—change the text, swap out an image, add a logo, you name it.
Let's walk through a real-world scenario: creating a personalized welcome image for a new user named "Alex."
Building a URL Step by Step
We'll start with a basic background image and layer on the customizations. The goal is a 600x300 pixel banner that says "Welcome, Alex!" and features our company logo.
First up, we need the base endpoint from our imaginary image service, "ImageGen":
https://api.imagegen.com/v1/render
Next, we have to authenticate our request. Most services use an API key, which we'll add as our first parameter. Parameters always start with a ? and are separated by an &.
?apiKey=YOUR_UNIQUE_API_KEY
Now for the fun part—adding the instructions. We'll tell the API which background image to use and what the text overlay should say, look like, and be colored.
&bg_image=https://okzest.com/background.jpg&text=Welcome, Alex!&font_size=48&font_color=FFFFFF
Putting it all together, our URL is starting to take shape. It might look a little long, but each piece has a specific job. You can get a deeper look into how these components work together in this guide to REST APIs for images.
Key Takeaway: Every parameter you add after the initial
?needs to be separated by an ampersand (&). This simple rule is the foundation for building any dynamic image URL, no matter how complex it gets.
Adding an Overlay and Controlling Output
Our image is looking good, but it needs some branding. Let's add a logo by simply adding another parameter that points to our logo's URL and tells the API where to stick it.
&overlay_image=https://okzest.com/logo.png&overlay_position=bottom_right
Finally, we need to define the final output. We have a specific size and format in mind.
&width=600&height=300&format=png
Let's assemble the complete URL now:
https://api.imagegen.com/v1/render?apiKey=YOUR_API_KEY&bg_image=https://okzest.com/background.jpg&text=Welcome,+Alex!&font_size=48&font_color=FFFFFF&overlay_image=https://okzest.com/logo.png&overlay_position=bottom_right&width=600&height=300&format=png
Did you notice how "Welcome, Alex!" became Welcome,+Alex!? The space was automatically URL-encoded into a + to ensure browsers and servers read it correctly. This is a small but critical detail, especially when you start using dynamic text that might contain special characters.
When you paste that full URL into your browser, you don't see code—you see your finished, personalized image, generated on the fly. It's an incredibly powerful process. Once you master the basics, you can apply this to more advanced use cases, like learning how to generate app screenshots for better conversions.
By knowing how to combine these simple building blocks, you can create an infinite number of visual variations from a single, intelligent link. This foundation is all you need to start automating your visual content.
Using Image URLs in Marketing Automation
This is where the rubber meets the road. Building an image API URL is one thing, but plugging it into your marketing automation tools is where you start seeing real results. By integrating these dynamic URLs, you can turn a generic broadcast into thousands of individual, personalized conversations.
The real magic comes from using the customer data you already have—names, locations, purchase history—to generate images that speak directly to each person. It’s a simple concept, but it's incredibly effective at cutting through the noise in a crowded inbox.
Personalizing Emails with Merge Tags
Email platforms like Mailchimp and Klaviyo are built around merge tags (or personalization tags, as they're sometimes called). These are little snippets of code that pull subscriber-specific data right into your emails. The cool part? You can stick these same tags directly into your image URL.
Here's how it works: when you send an email, your email provider finds the merge tag and replaces it with the subscriber's actual data before the image is ever requested from the API. The result is that every single recipient gets a custom-generated image, just for them.
Let’s say you’re setting up a welcome email. A generic banner is fine, but one that greets each new subscriber by name? That’s memorable.
- Mailchimp Merge Tag for First Name:
*|FNAME|* - Klaviyo Merge Tag for First Name:
{{ first_name }}
You’d just pop that tag into your image URL where you'd normally put a static name. For a Mailchimp campaign, the text parameter would look something like this:
&text=Welcome,+*|FNAME|*!
When an email goes out to a subscriber named "Sarah," Mailchimp swaps the tag. The API gets a request to create an image with the text "Welcome, Sarah!" and instantly, your banner feels personal. This is just scratching the surface of what you can do, as we cover in our guide to using a dynamic image API for email marketing.
The diagram below breaks down how an image URL is put together, from the basic endpoint to the specific parameters that tell the API what to create.
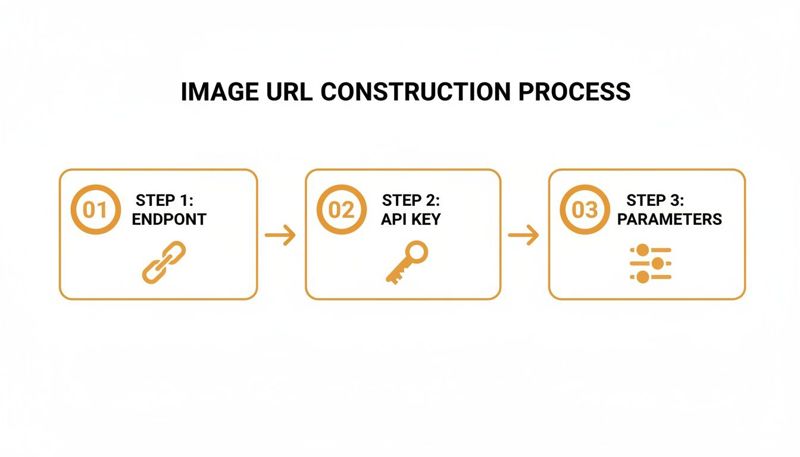
As you can see, each piece of the URL builds on the last, creating a complete set of instructions for the final image.
Creating Urgency with Dynamic Banners
Personalization isn't just about names. You can use an image API URL to create a powerful sense of urgency, which is a classic tactic for driving conversions. Two of the most effective ways to do this are with unique coupon codes and live countdown timers.
If you have a custom field in your email platform for a subscriber's unique coupon, you can display it visually.
- Example Merge Tag for a Coupon:
*|COUPON|* - URL Parameter:
&text=Your+code:+*|COUPON|*
This makes the offer feel exclusive and personal, and it also discourages people from sharing the code since it's tied to them.
Countdown timers take this dynamism a step further. Many image generation services can create an animated GIF timer on the fly, directly from the URL.
Pro Tip: For a countdown timer, you'll typically pass an end date and time in the URL. The API then generates a looping GIF that shows the time ticking down from the moment the user opens their email. It's a fantastic visual cue that an offer won't last forever.
A URL parameter for a timer might look like this:
&timer_end=2024-12-31T23:59:59Z&timer_color=white
Practical Examples and Ready-to-Use Structures
Let's pull it all together. Here’s what a complete URL structure might look like for a promotional banner in Klaviyo, personalized with a subscriber's first name and a unique discount code.
Base URL & Authentication:
https://api.okzest.com/render?apiKey=YOUR_API_KEY
Background & Sizing:
&bg_image=https://okzest.com/sale_bg.png&width=600&height=250
Personalized Text Layers:
- Greeting:
&text1_content=Hey, {{ first_name }}! - Offer:
&text2_content=Here is your 20% OFF code - Coupon Code:
&text3_content={{ properties.CouponCode }}
Of course, each of those text layers would also include parameters for font, color, and positioning to make the final image look great. When Klaviyo sends the email, it automatically replaces {{ first_name }} and {{ properties.CouponCode }} with the right data for each person.
This level of automation means you can run hyper-personalized campaigns at scale without ever opening a design tool. You build one smart URL template, and your marketing platform does all the heavy lifting, making sure every customer gets an image that was made just for them.
Advanced Image Customization Techniques
Once you’ve got the hang of adding basic text and logos, you can start digging into the really creative and powerful features of an image API URL. This is where you graduate from simple personalization to using logic and transformations to create visuals that are truly one-of-a-kind.
It’s less about just plopping text onto a picture and more about making the image itself react to your user's context.
These advanced tricks let you build conditional logic right into the URL, meaning a single link can serve up countless different visual scenarios. Think about changing a background based on the weather in a user's city or swapping out a logo depending on their company—it's all possible once you master the full potential of query parameters.
Implementing Conditional Logic in URLs
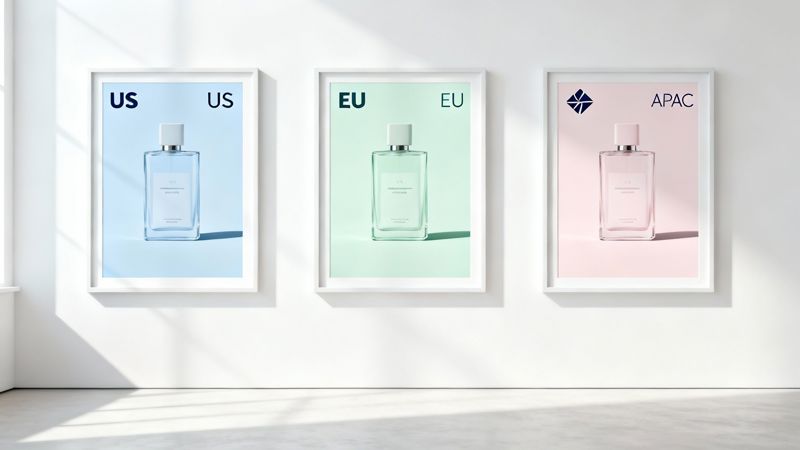
One of the most powerful things a modern image API can do is handle conditional logic. Instead of just passing a static value, you can create rules that change the final image based on the data you have. This is perfect for campaigns targeting diverse audiences across different regions or customer segments.
A classic real-world example is showing regional-specific imagery. Let's say you're running a global promotion and want to display a background image that feels local to the user (e.g., North America, Europe, or Asia).
You could build a URL that uses a placeholder for the user's region, like so:
&background_image=https://okzest.com/background_{{user.region}}.jpg
If the user's region is "NA," the API grabs background_NA.jpg. If it's "EU," it pulls background_EU.jpg. This simple, dynamic swap makes sure your creative is always relevant without needing to build separate campaigns.
You can also use this for branding. Imagine sending an email campaign to employees at different companies. You can dynamically pull in the correct company logo for each person.
- Parameter:
&logo_url={{company.logo}} - Result: The URL fetches the specific logo tied to each contact in your database.
This kind of automation makes it possible to run highly targeted B2B campaigns that feel professional and custom-made.
Applying Advanced Image Transformations
Beyond just swapping out elements, you can also manipulate the images themselves directly through URL parameters. This includes applying artistic filters, tweaking colors, and even generating simple data visualizations on the fly. It really opens up a whole new world of creative options.
The best part? The API handles all these transformations in real time, so you don't need any design software.
Common Transformations Include:
- Color Adjustments: Change the saturation, brightness, or contrast of an image. A parameter like
&saturation=-50could give a background a stylish, muted feel. - Artistic Filters: Apply effects like grayscale, sepia, or blur. Using
&filter=grayscaleis a quick way to create a classic black-and-white look. - Cropping and Resizing: Precisely crop an image to focus on a specific area or resize it to fit different social media formats.
Key Insight: These transformations aren't just cosmetic. You can use them to maintain brand consistency across thousands of images or to create a visual hierarchy that guides the user's eye to the most important information.
Generating Charts and Graphs from Data
For reports, dashboards, or data-driven marketing, some image APIs can even generate simple charts directly from data passed in the URL. This is an incredibly powerful way to visualize information without needing complex charting libraries.
For instance, you could create a personalized progress bar for a user in an online course or a simple bar chart showing their monthly usage stats.
A URL for a progress bar might look something like this:
&chart=progress_bar&progress=75&color=4A90E2
This would generate a clean, simple progress bar image set to 75% complete. It’s a fantastic way to make data-heavy emails more visual and easier to understand at a glance.
Handling Fallbacks for Missing Data
So, what happens when your personalization data is incomplete? A user might not have a first name in your database, or maybe a company logo URL is missing. Without a backup plan, you risk sending emails with broken images or awkward-looking blank spaces.
This is where fallback parameters save the day. A good image API lets you specify a default value to be used if the primary data isn't available.
Take personalizing a greeting, for example:
&text=Welcome, {{first_name | fallback:"Friend"}}!
In this case, if the first_name field is empty, the API automatically uses the word "Friend" instead. This ensures every image renders correctly and looks professional, no matter how clean your data is. The same logic applies to images; you can set a default logo or background if a custom one isn’t found.
This growing need for robust features is reflected across the industry. A 2025 survey showed 89% of developers were using generative AI or API-based tooling, driving demand for standardized API specs and better features like fallbacks. You can discover more insights about these API tool user growth trends on Arcade's blog.
Keeping Your Images Secure and Fast
Building dynamic image URLs is a fantastic way to personalize content, but it's not just about getting the creative side right. Once you move from a test environment to a live application, you have to think about security and speed. Without the right precautions, you could face slow load times, a poor user experience, or even find your service being misused.
Getting security and performance nailed down from the start is non-negotiable. It protects your resources, keeps the experience snappy for your users, and ensures your service stays reliable as you grow.
Securing Your Image URLs
An open, unsecured image API URL is basically an open invitation for trouble. Anyone could tweak the parameters to generate countless image variations, driving up your costs through a practice known as hotlinking. The good news? Preventing this is pretty straightforward.
There are two go-to techniques for locking down your image generation: URL signing and expiring links.
- URL Signing: This is your first line of defense. It works by adding a unique cryptographic signature, usually a hash, as a parameter to your URL. This signature is created using your secret API key and the other parameters in the URL. If anyone tries to change even a single character in the URL, the signature won't match, and the API will reject the request. This makes it impossible for unauthorized users to tamper with your URLs.
- Expiring Links: For time-sensitive images, like a flash sale banner or a secure document, you can add a timestamp to the URL signature. This tells the API to only fulfill requests made before a specific time, making the link useless after it expires.
By implementing URL signing, you ensure that only you can create valid links to generate images. It's a fundamental step that effectively walls off unauthorized access and stops resource abuse in its tracks.
Optimizing Performance with Caching
Security is one half of the equation; performance is the other. Every single time a dynamic image is created, it takes up server resources. If thousands of users are requesting the same personalized image, regenerating it from scratch every time is a massive waste of resources and will drag your whole system down. This is exactly what caching was designed to solve.
The idea behind caching is simple: store the generated image after the first request, then serve that stored copy for all future identical requests. This dramatically cuts down on server load and delivers images to your users almost instantly. We cover how APIs handle this kind of image retrieval in our detailed REST API image get example.
A solid caching strategy really comes down to two key parts.
Leveraging HTTP Headers and a CDN
First, you'll want to configure your server to send the right HTTP caching headers. Headers like Cache-Control and Expires are instructions for browsers and other intermediary caches, telling them how long they can hold onto and reuse an image before asking for a fresh copy. If an image isn't going to change, you can set a long cache duration and forget about it.
Second, using a Content Delivery Network (CDN) is a total game-changer. A CDN is a global network of servers that caches your content in locations physically closer to your users. When someone requests an image, the CDN serves it from the nearest "edge" location, which means lightning-fast delivery. The CDN takes care of all the caching logic, so your server only has to do the heavy lifting of generating an image once for each unique URL.
Managing API Keys and Rate Limiting
Finally, let's talk about good housekeeping for your API keys and implementing rate limits. Think of your API key as the master key to your entire image generation service—you need to protect it.
Never, ever expose your secret API key in client-side code, like in a browser's JavaScript. Any request that uses your secret key, especially for signing URLs, must happen on your secure backend server.
Rate limiting is another critical practice. It puts a cap on how many requests a user or an IP address can make to your API in a given period. This stops a single user from accidentally (or intentionally) flooding your service with requests and overwhelming it. It’s all about ensuring fair usage and keeping your service available for everyone.
A Few Common Questions About Image API URLs
Even when you've got the basics down, you're going to hit a few snags working with an image API URL. It just happens. This section is all about tackling those frequent questions and roadblocks I see all the time, with clear answers to get you unstuck fast.
Think of it as your troubleshooting guide, built from real-world bumps and bruises, so you can avoid the common pitfalls and get back to creating.
How Do I Handle Special Characters in Text Overlays?
This is a classic "gotcha" that trips up just about everyone at some point. If you need to include text with spaces, ampersands (&), or other non-standard characters in a URL parameter, you absolutely have to URL-encode it. If you don't, browsers and servers will get confused, and your URL will either break or render something completely unexpected.
The good news is that pretty much every programming language has a built-in function for this. In JavaScript, for instance, you'd reach for encodeURIComponent().
- Original Text:
John & Doe's Big Sale! - Encoded Text:
John%20%26%20Doe's%20Big%20Sale!
By encoding that text parameter, you're making sure the API receives the exact string you intended, with all its special characters and spaces perfectly preserved.
What Is the Best Way to Debug a Broken Image URL?
When an image URL throws an error, the key is to isolate the problem. Don't just stare at the complete, massive URL and hope to magically spot the typo. You need a more systematic approach.
- Paste the URL Directly into Your Browser: Before you do anything else, just copy the full URL and paste it into your browser's address bar. Often, the API is smart enough to return a JSON error message (like
{"error": "Invalid API key"}) that tells you exactly what’s wrong. - Build the URL Incrementally: If the browser just shows a generic broken image icon, start simple. Begin with just the base endpoint and your API key. Does it work? Great. Now add one parameter at a time, refreshing after each addition. The second it breaks, you've found your culprit.
- Check the API Documentation: Let's be honest, a simple typo is the most common reason things break. Double-check that all your parameter names (is it
font_colororfont-color?) and values are exactly what the API's documentation expects.
Troubleshooting is just a process of elimination. Test each piece of the image API URL one by one, and you'll quickly figure out what's causing the problem.
Can Search Engines Like Google Index API-Generated Images?
Yes, they absolutely can. A crawler like Googlebot doesn't really care how an image was made; it only sees the final HTML <img> tag on your page. As long as the src attribute in your image tag points to a valid, working image URL, Google will crawl and index it just like any other static .jpg or .png file.
If you want to make your dynamic images SEO-friendly, you just need to focus on a couple of key things:
- Stable URLs: Try to make sure the URL for a specific image combination doesn't change all the time. If the image for "Welcome, Bob" always uses the same URL, search engines can cache and index it much more reliably.
- Descriptive Alt Text: This is huge. Always, always include descriptive
alttext in your<img>tag. For example,<img src="..." alt="A personalized welcome banner for Bob">. This gives search engines (and screen readers) crucial context about what the image actually is.
At OKZest, we provide the tools to create stunning personalized images effortlessly, with robust API solutions and no-code builders. Start automating your visual content and see the difference it makes. Explore OKZest and begin your free trial today.