Let's be honest, a standard ticket is just a barcode. But personalized tickets for an event? That's an experience.
They represent the very first tangible connection an attendee has with your brand. That simple act of adding their name turns a forgettable transaction into a memorable welcome, building genuine anticipation and making people feel like they actually matter.
Why Personalized Tickets Are a Marketing Powerhouse
As event organizers, we're all chasing the same thing: a sold-out, buzzworthy experience. We obsess over speakers, venues, and sponsors, but often overlook one of the earliest and most powerful touchpoints—the ticket itself.
A generic, black-and-white PDF confirmation is a massive missed opportunity. Sure, it’s functional, but it does absolutely nothing to inspire excitement or build a connection.
Personalized tickets, on the other hand, transform this mundane step into a brilliant marketing tool. Just by adding an attendee's name to a beautifully designed digital pass, you immediately elevate their entire experience. It’s a subtle but powerful shift from a mass-produced entry pass to a personal invitation.
This simple change delivers some serious benefits that directly impact your event's bottom line:
- Boosts Perceived Value: A custom ticket feels premium and exclusive, making the event itself seem more valuable right from the start.
- Encourages Social Sharing: Attendees are far more likely to share a cool-looking ticket with their name on it, creating organic buzz and free promotion for you.
- Improves Email Engagement: Let's face it, inboxes are crowded. Emails containing personalized images cut through the noise, leading to much better open and click-through rates.
The Financial and Engagement Impact
This strategy isn't just about making people feel good; it has a measurable effect on the numbers. The live event ticketing market is absolutely booming—valued at USD 82.24 billion in 2024 and projected to keep climbing, driven largely by this kind of data-driven personalization.
There's a good reason for that: custom experiences get results. For instance, personalized invites can bump up email open rates by as much as 26% when they include dynamic images. If you're curious, you can explore more data on the ticketing market to see the full picture.
The moment an attendee sees their name on a ticket, they stop being just a number in your registration list. They become a recognized guest, and that feeling of belonging is what turns attendees into loyal fans.
To really see the difference, let's break it down.
Personalized vs Standard Tickets At a Glance
See the direct impact of personalization on the attendee journey and your marketing goals.
| Attendee Experience | Standard Ticket Impact | Personalized Ticket Impact |
|---|---|---|
| First Impression | Functional but forgettable. A generic email confirmation. | Feels like a personal invitation. Memorable and exciting. |
| Brand Connection | Minimal. The ticket is a utility, not an experience. | Strong. Creates an immediate, positive brand association. |
| Social Sharing | Unlikely. There's nothing unique or share-worthy. | Highly likely. People love sharing things with their name on them. |
| Emotional Response | Neutral. "Okay, I'm registered." | Positive. "This looks cool! They value me as a guest." |
| Email Engagement | Lower. Just another email in a crowded inbox. | Higher. Personalized images stand out and drive clicks. |
It's clear that the small effort of personalizing a ticket creates a ripple effect, improving everything from brand perception to organic marketing reach.
Making Personalization Accessible
In the past, creating unique tickets for every single attendee would have been a logistical nightmare, requiring a design team and some seriously complex software. Not anymore.
Today, tools like OKZest make this level of detail accessible to everyone. You can automate the entire process without writing a single line of code.
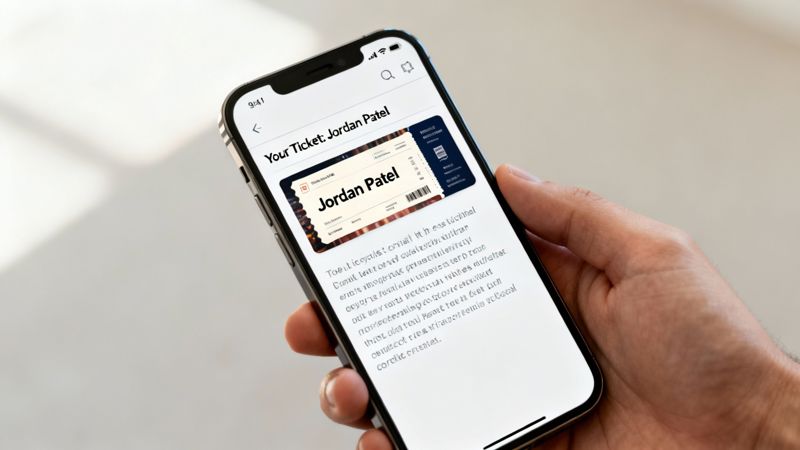
Here’s a quick look at what a personalized ticket can look like, blending your event's branding with individual attendee details for a truly premium feel.

This image shows exactly how a simple name customization turns a generic pass into a personal keepsake. It builds a stronger connection right from the get-go. Whether you're hosting an intimate workshop or a massive conference, this technique creates a polished, professional impression that sets the stage for an unforgettable event.
Crafting Your Ticket Design and Data Foundation
Before you can fire off thousands of personalized event tickets, you have to get your house in order. A truly great personalization campaign hinges on two things: a killer ticket template and clean, organized attendee data. Nail these two, and everything else falls into place much more easily.
Think of your ticket template as the canvas. It needs to be well-designed, on-brand, and thoughtfully structured to let the personalized details really pop. This isn't just about sticking a logo on a colored background; it's about strategically deciding which parts of the ticket will be static and which will change for every single attendee.
Before getting lost in the weeds of dynamic content, it's worth reviewing some practical advice on creating event tickets. This covers the fundamentals of branding and pricing, which will ensure your design is aligned with your overall event goals from the start.
Designing a Strategic Ticket Template
First things first, you need a base image. This template is the foundation for every ticket you'll generate. The trick is to design it with intentional blank spaces—placeholders just waiting for the dynamic content you'll add later.
Here are a few design tips I've learned from experience:
- Leave Room for Variation: People's names aren't all the same length. "Jen Yu" is a lot shorter than "Christopher Bartholomew." Make sure the space you set aside for names can handle longer entries without looking squished or, worse, breaking your design.
- High-Contrast Placement: Dynamic text like names or seat numbers should always be placed over simple, solid, or muted backgrounds. Readability is non-negotiable and crucial for a smooth check-in experience.
- Image Sizing and Resolution: Design your template at a decent resolution, something like 1200x630 pixels, to keep it looking crisp on everything from a high-density phone screen to a laptop. A blurry ticket just looks amateurish and cheapens the whole event.
If you're stuck for ideas, browsing through some well-designed templates for event tickets can give you some great starting points for layouts that perfectly balance branding with personalization.
Organizing Your Attendee Data
Your design is only half the story. The other half is the data that brings it to life, which usually lives in a spreadsheet like a CSV or Google Sheet. The quality of your data has a direct, one-to-one impact on the quality of your tickets. A messy spreadsheet guarantees a mess on the other end.
A little data hygiene goes a long way. This just means cleaning up your list before you even think about connecting it to your design.
Data Cleanup Checklist:
- Standardize Capitalization: Make sure names are in title case ("John Smith," not "john smith" or "JOHN SMITH"). Pretty much any spreadsheet software has a function to fix this in one click.
- Check for Missing Fields: Give your critical columns, like
FirstNameorLastName, a quick scan for any empty cells. - Trim Extra Spaces: Use the "TRIM" function in your spreadsheet to get rid of any sneaky leading or trailing spaces in your cells. They can wreak havoc on formatting.
A classic mistake is forgetting about incomplete data. Maybe your registration form didn't require a last name, so you have a bunch of rows with missing info. This is exactly where planning for fallbacks becomes a lifesaver.
The Importance of Fallback Text
So, what happens when some data is missing? A big blank space on a ticket looks like a mistake. This is where fallback text saves the day. It’s simply a default value you set that will appear if its corresponding data field is empty.
For instance, if the FirstName cell is blank for an attendee, you could set the fallback text to "Valued Guest." Instead of an awkward gap, the ticket now reads "Welcome, Valued Guest!" It’s a small detail, but it ensures every single ticket looks professional and complete, protecting your event's brand and the attendee experience—no matter how imperfect your data is.
Bringing Your Dynamic Tickets to Life with No-Code Tools
This is where your design and data finally come together to create that unique, personalized experience for every attendee. Using a no-code image merge platform, you can turn your vision into reality without writing a single line of code. These tools are built for marketers and event organizers, not developers.
Forget about wrestling with complex software. The process is refreshingly straightforward: upload your ticket template, connect it to your attendee spreadsheet, and then map your dynamic fields to the right data columns. It’s a visual, often drag-and-drop, process that lets you generate hundreds or even thousands of unique tickets in minutes.
The core setup really boils down to three simple stages: getting the design right, preparing your data, and setting up fallbacks for any errors.

As you can see, success really hinges on nailing those foundational elements—your design and data—before you even start the merge.
Mapping Data to Your Design
Once your template is uploaded and your spreadsheet is connected, it's time to link them. This is the part where you tell the platform which column in your spreadsheet should fill in each dynamic spot on your ticket.
It's pretty intuitive. For instance, you’ll map the FirstName column from your data to the text layer you set aside for the attendee's first name. You’ll do the same for the QRCode column, linking it directly to the QR code layer in your design.
The mapping interface is usually very clear, allowing you to select a design layer and choose the corresponding data column to create that direct link.
The real beauty of no-code tools is that they handle all the heavy lifting behind the scenes. You get to focus on the creative and strategic parts, while the software takes care of generating a unique image URL for every single person on your list.
Going Beyond the Basics with Advanced Features
While personalizing names and QR codes is a great start, many platforms offer advanced features to make your tickets even more impressive. These capabilities can add a layer of sophistication that truly wows your attendees.
Here are a few advanced options you could explore:
- Live Countdown Timers: Imagine a timer right on the ticket image, counting down to the event start time. It's a fantastic way to build anticipation every time someone looks at their ticket.
- Conditional Logic: This lets you show different design elements based on an attendee's data. For example, you could have a "VIP" banner automatically appear only for attendees in your VIP segment.
- API Integrations: For more technical setups, an API allows for real-time data lookups. You could pull an attendee's profile picture from your database and place it directly on their ticket for the ultimate personal touch.
If you design your tickets in a tool like Canva, you'll be happy to know you can often automate Canva designs with these platforms, making the jump from a static design to dynamic generation completely seamless.
Personalization is a massive driver in the booming online event ticketing market—a sector valued at USD 29.8 billion in 2024. AI-driven recommendations and custom experiences have been shown to lift conversion rates by 15-20%, showing a clear return. Top festivals have sold out by offering personalized VIP packages, proving just how powerful it is to make every interaction feel unique.
For more general dynamic content needs, you might explore platforms with broader AI capabilities. For example, some tools like the AI-powered platform supportgpt offer a wide range of features for creating dynamic text and data elements that can be applied to marketing campaigns well beyond just event tickets.
Delivering Your Personalized Tickets
You’ve designed a beautiful, personalized ticket. That’s a huge win. But a masterpiece is worthless if no one sees it. Getting that ticket into your attendee's hands is just as critical as the design itself.
The goal is to make your custom ticket land perfectly in an inbox, pop up on a confirmation page, or even slide into their DMs. Let’s break down how to make that happen.
Email: The Classic Delivery Channel
Your best bet is almost always email. The registration confirmation or a pre-event reminder is the perfect moment to unveil the personalized ticket you've created. This sounds technical, but it’s far simpler than you’d think—no complex coding required.
Your image personalization tool will give you a special image URL for your ticket template. This isn't a normal URL; it's packed with merge tags, which are just placeholders that your email service provider (ESP) will automatically fill with each attendee's specific data.
Integrating With Email Platforms
Whether you’re on Mailchimp, Klaviyo, or another big ESP, the process is pretty much the same. You just copy the dynamic image URL from your tool and paste it into the source code of your email template where a static image URL would normally go.
A dynamic URL will look something like this:
https://images.okzest.com/your-template-id?name={{FirstName}}
When your campaign goes out, the {{FirstName}} part gets swapped with the name from your email list, serving up a unique ticket image for every single person. It’s this simple copy-and-paste that makes creating thousands of personalized tickets for an event not just possible, but ridiculously efficient.
To really nail this first impression, check out our guide on crafting the perfect event registration confirmation email. It’s full of tips on everything from subject lines to calls-to-action.
Create an Instant Wow Moment on Confirmation Pages
Why make people wait for an email? You can drop their personalized ticket right onto the registration confirmation page. This gives them that hit of instant gratification and immediately reinforces the value of your event the second they sign up.
You use the exact same dynamic image URL. Just embed it in the HTML of your confirmation page. When a user fills out the form, their data is passed to the URL, and poof—their unique ticket appears on the screen.
This one small touch transforms a boring "Thank You" page into a genuinely exciting, shareable moment. It’s the first signal that your event is a premium experience, and it gets people to save or screenshot their ticket right away.
The impact here is huge. The North American online event ticketing market is valued at USD 8.2 billion in 2024, and a lot of that growth is fueled by mobile ticketing and AI-powered personalization. In fact, delivering personalized tickets via email or social DMs has been tied to attendance bumps of up to 40% at major U.S. sporting events, where over 90% of transactions happen on mobile apps. You can discover more insights about the online ticketing market to see how these trends are playing out.
Don't Stop at Email: Expand Your Delivery Channels
Email and web pages are great starting points, but they’re not the only game in town. That dynamic image URL is incredibly versatile, so you can use it across a bunch of different platforms to meet attendees where they are.
Think about adding these channels to your mix:
- WhatsApp and SMS: For a direct, can’t-miss-it approach, send the ticket link via a messaging app. Open rates are off the charts, making it perfect for last-minute reminders.
- Social Media DMs: Running a contest or have a super-engaged social following? Sending personalized tickets through a direct message is a powerful way to create a memorable, one-on-one interaction.
- Chatbots: Build the ticket right into your event’s chatbot flow. When someone asks for their ticket, the bot can generate and deliver the personalized image instantly.
At the end of the day, effective delivery is about reaching your audience on their turf with an experience that feels like it was made just for them. By using a flexible dynamic image URL, you can distribute personalized tickets across your entire marketing ecosystem, building excitement from the very first touchpoint.
Don't Skip the Final Check: Testing and Troubleshooting
You wouldn't send a keynote speaker on stage without a soundcheck, right? The same logic applies here. Launching a campaign without thoroughly testing it first is just asking for trouble. This final check is what ensures all your hard work pays off with a flawless experience for every single attendee.
Before you even think about sending this to your full list, run an internal test. Send a small batch of personalized tickets to yourself and a few trusted teammates. This is your chance to catch any glaring issues in a safe, controlled environment before they become public mistakes.
This internal review is more than a simple spell-check. You need to confirm that all the dynamic data is mapping correctly. Does "Alexandra" actually show up as "Alexandra," or did a weird encoding issue turn it into gibberish? Is the QR code genuinely unique for each person on your test list? Get this right, and you're halfway there.
The Cross-Platform Rendering Check
Once you've confirmed the data is solid, it's time to see how your personalized tickets for an event actually look across different email clients. An image that looks picture-perfect in Gmail might be a broken, distorted mess in Outlook. It’s a classic email marketing headache that can quickly tarnish your professional image.
Your testing checklist should cover the big players:
- Gmail: Make sure to check it on the web client and the mobile app.
- Outlook: This one is notorious for rendering issues, so test it on both Windows and Mac.
- Apple Mail: See how it looks on both iOS and macOS devices.
Keep an eye out for common rendering problems—images not loading, text wrapping awkwardly, or the ticket appearing blurry or too small. Spotting these issues now lets you tweak your design or email template before it becomes a real problem for thousands of people.
Diagnosing Common Campaign Pitfalls
Even with the most careful planning, things can go sideways. The trick is to know how to diagnose and fix the most common problems without panicking. A broken campaign can almost always be traced back to a few usual suspects.
For example, if your images aren't showing up at all, the very first thing to check is the dynamic image URL. A simple copy-paste error or a single forgotten character can break the whole thing. Another frequent culprit is incorrect data on the ticket, which usually points back to a mapping error where you linked the wrong spreadsheet column to a design layer.
Here’s a quick troubleshooting guide for the most common hiccups:
| Problem | Likely Cause | Simple Fix |
|---|---|---|
| Broken Image | The dynamic image URL is incorrect or has a typo. | Double-check the URL you pasted into your ESP. Make sure all merge tags are formatted correctly. |
| Wrong Name on Ticket | Data mapping error in the personalization tool. | Revisit your setup and confirm the FirstName column is correctly linked to the name layer on your ticket design. |
| Blank Spaces Appear | Missing data in your spreadsheet and no fallback is set. | Go back to your design setup and add fallback text (e.g., "Valued Guest") for any field that might be empty. |
| Blurry or Pixelated Ticket | The original template image has a low resolution. | Re-export your ticket template from your design tool at a higher resolution (e.g., 1200 pixels wide). |
Launching with confidence means knowing you’ve already anticipated and solved the most likely problems. A thorough testing process isn't a chore; it’s your insurance policy for a smooth and successful event launch.
Making Sure Your Campaign Can Scale
Finally, let's talk about scale. You might be wondering if a system that works for a 50-person webinar can really handle a 50,000-attendee festival. The answer is a resounding yes.
Modern image personalization platforms are built on cloud infrastructure designed to handle massive volume. They can generate and serve millions of unique images without breaking a sweat. The process for you is exactly the same whether you have ten attendees or ten thousand. Your job is to make sure your data is clean and your design is solid—the platform will handle the heavy lifting, delivering a reliable and fast experience for every single recipient.
Common Questions About Creating Personalized Tickets
As you start dipping your toes into personalized tickets, a few questions are bound to come up. It's a powerful way to connect with attendees, but it’s natural to wonder about the practical side of things. I've pulled together some of the most common questions we hear from event organizers to give you clear, direct answers.
This isn’t about wrestling with complex tech. It’s about seeing how simple, smart tools can create a much better experience for your audience. Let's get into the specifics.
What Happens If Some Attendee Data Is Missing?
This is easily the most common concern, and the good news is, it's a solved problem. Modern personalization platforms are built to handle imperfect data with a feature called "fallback text."
Think of it as your safety net. You can set a default value, so if a name is missing from your spreadsheet, the ticket won't have an awkward blank space. Instead, it can automatically show a friendly greeting like "Valued Guest" or "VIP Attendee." This small step keeps every ticket looking professional and preserves a high-quality feel, even when your data isn’t perfect.
Will Dynamic Tickets Work with My Email Platform?
Yes, almost certainly. Image personalization tools are designed to be universally compatible with all the major Email Service Providers (ESPs) like Mailchimp, Klaviyo, ConvertKit, and countless others. The integration is surprisingly straightforward.
The platform just gives you a special image URL that contains merge tags. You copy that single line of text and paste it into your email template wherever you'd normally put an image. Your ESP handles the rest—it recognizes the merge tags, pulls in each person's unique data, and tells the tool which personalized image to display. It’s a seamless process that works right out of the box with the tools you already use.
How Much Technical Skill Is Really Needed?
This is a big one, and the answer is: way less than you'd think. If you're comfortable with a tool like Canva and can manage a basic spreadsheet, you already have all the skills you need to create stunning personalized tickets for an event.
The whole workflow is designed for marketers and event organizers, not developers. It’s a visual process: you upload a background, add layers for your dynamic text (like names or seat numbers), and then link those layers to your data columns. The goal of these no-code tools is to make sophisticated, high-impact personalization accessible to everyone.
The real shift is moving from thinking like a developer to thinking like a creative marketer. The tools handle the "how," so you can focus on creating an amazing "what"—that unforgettable first impression for your attendees.
Can I Use This for Virtual or Hybrid Events?
Absolutely. Personalization is incredibly effective for any event format because it clarifies the experience for each individual. The ticket becomes more than an entry pass; it's a central hub of communication.
- For Virtual Events: The ticket can include a unique, clickable access link or a QR code that logs the attendee directly into the virtual platform. This removes friction and makes joining the event totally effortless.
- For Hybrid Events: A personalized ticket can clearly show whether someone is joining in-person or virtually. It can display just the relevant details for their specific experience, like a venue address or a streaming link, all on one ticket.
This level of clarity cuts down on confusion and support questions, creating a better experience for every single attendee, no matter how they choose to join.
Ready to create a standout experience for your next event? With OKZest, you can effortlessly generate beautiful, personalized tickets that capture attention and build excitement. Start creating for free and see how simple it is to make every attendee feel like a VIP.