To make an image into a link, you simply wrap an <img> tag inside an <a> tag with your HTML. This straightforward bit of code tells the browser that the entire image should act as a clickable hyperlink, sending users to whatever URL you specify.
Why Clickable Images Drive Better Engagement
Before we get into the nitty-gritty of the code, it's worth taking a moment to understand why this is such a powerful tactic. We're wired to respond to visuals, and a compelling image grabs our attention far more effectively than a line of text. By making that image clickable, you turn a static picture into an interactive gateway.
Instead of just showing a product, you can lead a customer directly to the purchase page. Rather than just displaying a banner for your latest blog post, you can guide readers straight into the full article. It’s all about creating a more intuitive and seamless journey for your visitors.
The User Experience Advantage
The real magic here is in reducing friction. When someone sees an appealing image—say, of a product they like—their natural next thought is to learn more or maybe even buy it. Making that image clickable instantly satisfies their intent without forcing them to hunt around for a separate button or text link.
This infographic breaks down how that visual-to-action process works.
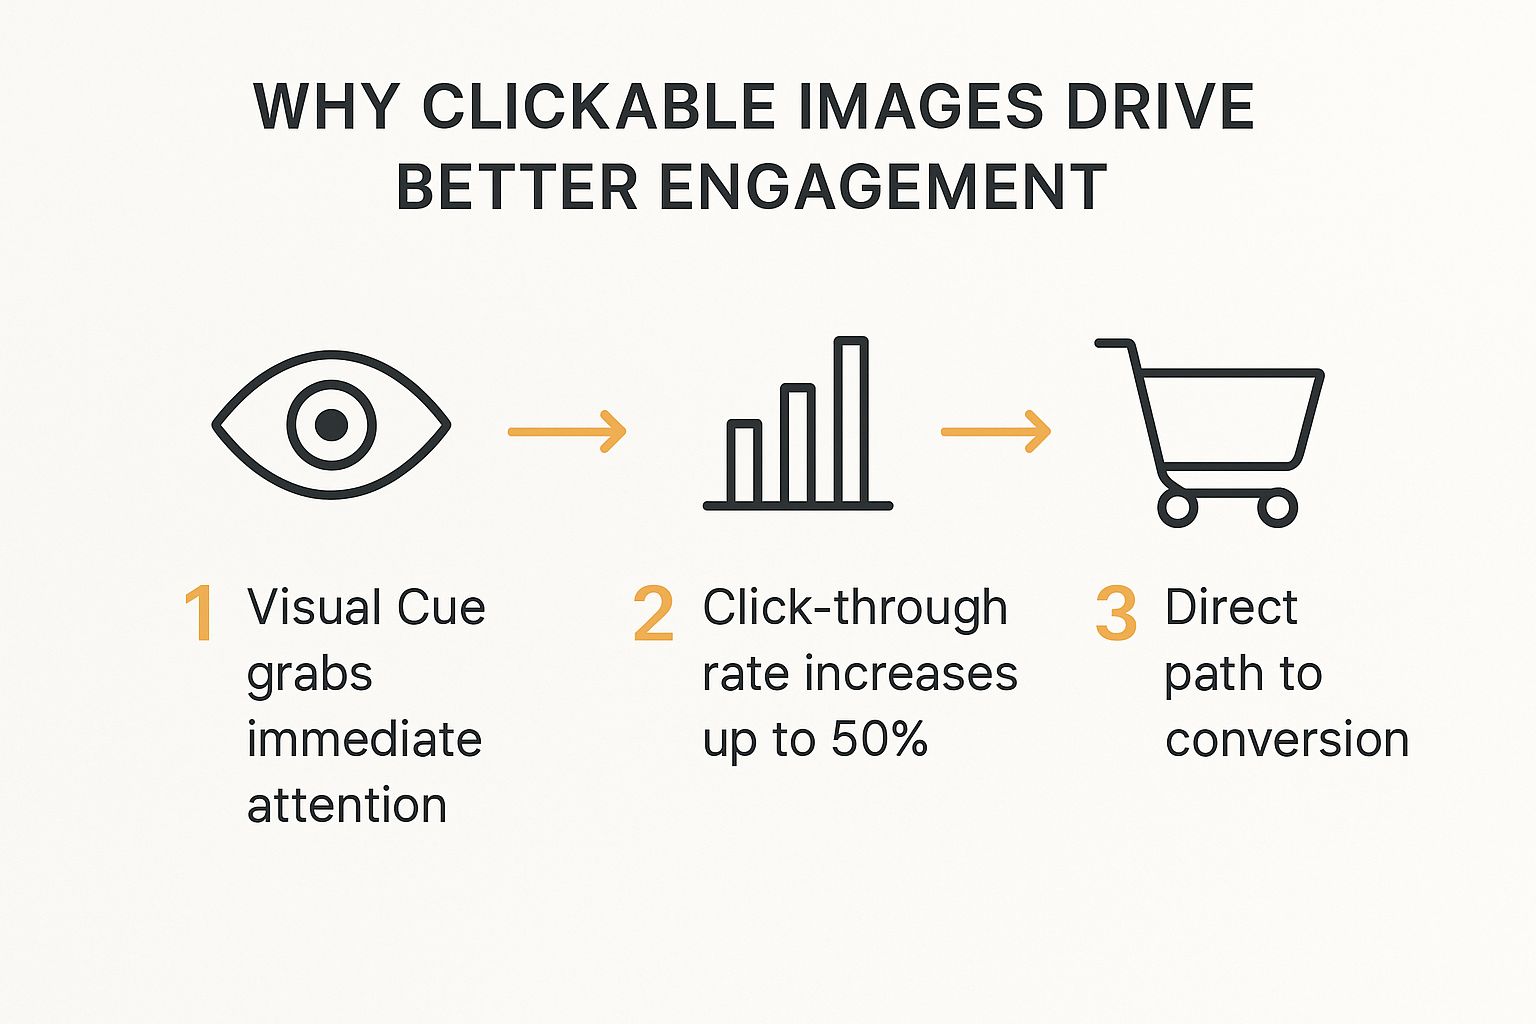
As you can see, the path from initial interest to final action becomes much simpler, which naturally boosts your chances of conversion. To get a better handle on the broader impact of these kinds of interactions, it’s helpful to understand what engagement rate is and why it matters.
You can also find more hands-on strategies in our guide on https://okzest.com/blog/creating-image-links.
Making an Image Clickable with Basic HTML
Ready to roll up your sleeves? The most direct way to make an image clickable is with a little bit of HTML. This is the foundational method that works absolutely everywhere—from a simple blog post to a sophisticated email campaign. All it takes is combining two fundamental tags: the anchor tag (<a>) and the image tag (<img>).
Think of it this way: the anchor tag (<a>) is the destination, telling the browser where to go. The image tag (<img>) is the vehicle that gets you there. You simply wrap the image inside the anchor tag, and just like that, the picture becomes a functional link.
It's a surprisingly simple concept, but it’s what gives your visuals a real purpose beyond just looking good.

The Core Code Structure
Let's get straight to the code. At its heart, the structure for a clickable image looks like this:

That’s it. This small snippet is all you really need. Notice how the <a> tag opens before the <img> tag and closes after it? This "wrapping" technique is what makes the whole thing interactive.
Breaking Down the Key Attributes
To make sure your image link works flawlessly, you need to get familiar with a few key pieces inside the tags, known as attributes. Each one has a specific job to do, telling the browser, search engines, and screen readers exactly what's going on.
For a quick overview, here’s a table of the essentials you'll be using.
Essential HTML Attributes for Image Links
| Attribute | What It Does | Example Usage |
|---|---|---|
| href | The "hypertext reference." This is the most crucial part—it’s the destination URL where the user will go after clicking. | <a href="https://okzest.com"> |
| src | Short for "source." This attribute in the <img> tag points to the location of your image file. |
<img src="logo.png"> |
| alt | The "alternative text." This provides a text description for screen readers and search engines, and it shows up if the image fails to load. | <img ... alt="OKZest company logo"> |
Getting these attributes right is key to creating links that are not only functional but also accessible and SEO-friendly.
Pro Tip: I almost always add
target="_blank"to my anchor tags when linking to external sites. This simple attribute forces the link to open in a new browser tab, which is a great user experience trick. It lets visitors check out the new content without losing their place on your page.
If you want to go a bit deeper into the mechanics of turning pictures into links, feel free to explore our full guide on hyperlinking an image. It's packed with more examples and context.
Give Your Images Some Flair with CSS
A basic clickable image gets the job done, but a styled one? That’s where you start to see real engagement. With just a handful of CSS tricks, you can turn a simple link into something that looks and feels truly interactive. These little visual hints tell your visitors, "Hey, you can click this!" which can make a huge difference in your click-through rates.
One of the first things I always tackle is the default border. Some browsers, especially older ones, love to wrap linked images in a clunky blue border. It’s distracting and can throw off your whole design. A single line of CSS is all it takes to banish it for good, keeping your site looking clean and professional.

Creating Fun and Engaging Hover Effects
This is where the real magic happens. Hover effects are the little animations that pop up when someone moves their mouse over an image. They provide immediate feedback, confirming that the element is clickable and making your page feel much more alive and responsive.
Here are a few of my go-to hover effects that are easy to implement with CSS:
- A Gentle Zoom: Making the image scale up just a tiny bit on hover is a classic for a reason. It’s an eye-catching effect that pulls the user in without being too aggressive.
- A Soft Shadow: I'm a big fan of using
box-shadowon hover. It makes the image look like it's lifting right off the page, adding a nice bit of depth that highlights the interactive element. - A Color Overlay: You can also add a semi-transparent color overlay that only appears on hover. This is fantastic for adding a branded touch or for darkening an image so that text on top becomes easier to read.
Getting these styles to work is pretty straightforward. You just need to target the image when it's inside its anchor (<a>) tag. A common way to do this is with a CSS selector like a img:hover, which tells the browser to apply the styles only when the cursor is over that specific linked image.
Pro tip: A great user experience is all about the little details. Always add a
transitionproperty to your CSS hover effects. It makes the animation smooth and fluid instead of sudden and jarring, which gives the whole interaction a much more polished feel.
By adding these interactive touches, you’re doing more than just styling a link—you’re creating a more engaging element. It’s a small amount of work that goes a long way toward making your website look more professional and user-friendly, guiding your visitors exactly where you want them to go.
Creating Image Links in WordPress and Other Platforms
While it's handy to know what’s going on under the hood with HTML, you definitely don't need to be a coder to make an image clickable. Most modern content management systems (CMS) and marketing platforms have user-friendly visual editors that do all the heavy lifting for you.
Platforms like WordPress and Shopify, for instance, have made this incredibly simple. You just upload your image, click on it, and look for a little toolbar icon that looks like a chain link. From there, you just paste in your destination URL, and you're done. If you're just getting your feet wet, a good guide on how to start a blog can be a lifesaver for navigating these initial setup steps.
Using Visual Editors Like WordPress
The WordPress block editor is a perfect example of how straightforward this is. You add an image block to your page, pop your picture in, and a clean interface appears right there for adding a link. It’s all very intuitive.

This visual approach takes the guesswork out of the equation. You see exactly what you're building in real-time. Email marketing tools like Mailchimp use a nearly identical drag-and-drop process, so the skills are easily transferable.
Dynamic Image Links in Email Campaigns
Now, let's take it a step further. You can create some really powerful, personalized experiences in your email campaigns using this same idea. Tools like OKZest let you insert merge tags directly into the URL field of an image you want to make clickable.
This means every single person on your email list can get a unique image that links to a personalized destination, like a custom landing page or a pre-filled form just for them.
This is an incredibly effective way to boost engagement. Imagine sending an email with an image of a personalized certificate that, when clicked, takes each person to their own unique download page. If you want to get into the nuts and bolts of how that works, check out our guide on API integration for personalized content at https://okzest.com/blog/api-integration-tutorial.
This technique is especially potent when you consider the sheer scale of social platforms where images are shared. With over 5.24 billion social media users worldwide spending an average of 2 hours and 21 minutes a day scrolling, making your visual content interactive is no longer just a nice-to-have.
Common Mistakes That Can Derail Your Image Links
It’s one thing to know how to create an image link, but knowing what not to do is just as important. A few simple mistakes can completely undermine your hard work, leading to a clunky user experience, broken links, and missed opportunities to connect with your audience.
Let's walk through some of the most common pitfalls I see.
Don't Let Huge Images Slow You Down
The most frequent error I run into is people overlooking image file size. That beautiful, high-resolution image might look fantastic, but if it's several megabytes, it's going to slam the brakes on your page load time. This isn't just about frustrating visitors; it's a red flag for search engines and can seriously hurt your SEO.
Alt Text is Non-Negotiable
Another critical misstep is neglecting alt text. The alt attribute is an absolute must-have for accessibility, as it allows screen readers to describe the image to visually impaired users. But it's also a big deal for SEO. Search engines treat this text as the anchor text for your link, giving them valuable clues about what the destination page is about. Leaving it empty is just a wasted opportunity.
Broken Links and Not Knowing Your Audience
This one seems obvious, but you’d be surprised how often it happens: broken links. Always, always double-check your destination URLs to make sure they actually work. Nothing kills trust faster than a user clicking on a promising image only to be dumped on a 404 error page.
Pro Tip: Get into the habit of testing your image links in an incognito browser window. This is a great way to confirm the link works for everyone, not just for you because you happen to be logged into a specific platform.
Finally, remember who you're building these links for. Effective imagery and design are completely dependent on your users. For instance, as of 2024, internet usage stats show some clear demographic patterns. We know that 79% of individuals aged 15 to 24 are active online, and women make up about 65% of female internet users. Keeping trends like these in mind helps you pick visuals that will actually connect with the people you’re trying to reach. You can discover more insights about digital populations on Statista.com.
Got Questions About Image Links?
Once you start making images clickable, a few common questions tend to pop up. Let's run through the most frequent ones I hear, so you can handle these specific scenarios like a pro.
Can You Make a Background Image Clickable?
This is a classic. You can't directly link a CSS background-image, but the go-to workaround is simple and just as effective.
You start by creating a standard link with an <a> tag. Then, you use a bit of CSS to give it a display: block property. This is the key part—it lets you assign a specific height and width to the link. Finally, just apply your background image to that block-level link, and voilà, the whole area is now a clickable hotspot.
Is Adding a Link to an Image Bad for SEO?
Quite the opposite, actually. Linking an image can be a good thing for SEO, but only if you do it right.
The most important piece of the puzzle is to always use a descriptive alt attribute on your image tag. Search engines see this alt text as the anchor text for the link, which gives them valuable context about where that link is going. A well-written alt tag helps Google understand your content, and it’s a huge win for accessibility, too.
Always use relevant alt text and make sure your link isn't broken. This simple habit is great for SEO and user experience, making it a non-negotiable step in my book.
Can a Single Image Have Multiple Links?
Absolutely. This is where HTML image maps come into play. It's a slightly more advanced technique, but it’s perfect for when you need different parts of an image to link to different places.
With an image map, you can define specific clickable "hotspots" on your image—think rectangles, circles, or even custom polygons. Each of these hotspots can then be pointed to its own unique URL. It’s the perfect solution for interactive diagrams, product showcases where you want to link to different features, or detailed maps.
Ready to take this a step further? With OKZest, you can create stunning, personalized visuals for every single person on your list, complete with dynamic, clickable links that are unique to them. Start for free and see just how easy it is to make your campaigns more engaging.